


Good Morning Jungle people,
the wait is over and the Quest is over too. We did ask you if you can stamp it?
And you did! First I was a little scared that to less entries were dropping in but the last days I wrote one email after the other to confirm your entries. Thanks to everybody who took his/her time. It seems those who took part had massive fun.
I will now show your entries, they get numbers (but they are not connected to winning anything yet) - everybody was allowed to show as many different stamps as he likes, but the rule was to mark one as their favourite. I will mark those with a "!".
Let's see what we got here ...
#1 __________________________________________________________
Florian aka Tuffskull says:
"I used my wife as a stamp – as you know her I don’t send a picture of her seperately. The clay I used was gypsum. Maybe a nice terrain piece."
!

#2 __________________________________________________________
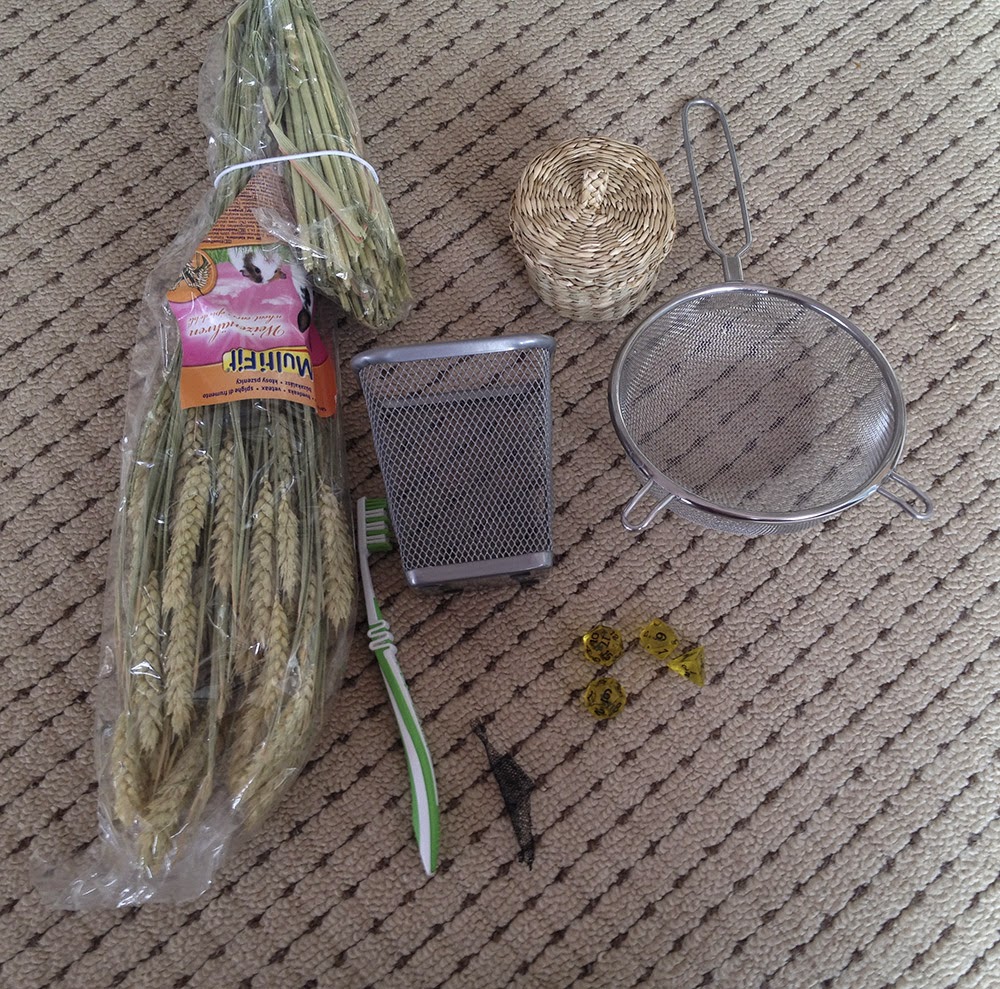
Lena says:
"I will just make it really short.
I used a bunch of things like pen holders, wheat, a toothbrush, lace, dice, a sponge and paint bottles. The lace and pen holders made really cool dragon scales, I was impressed how good they looked. But my favourite one was the toothbrush.
The result looks like a really destroyed surface, like demon skin, rotting flesh or heavily wheathered metal. An effect you can use for many many applications and a toothbrush is something everyone has at home or even already with your painting stuff for making splatters etc.
So that was my favourite!"


!


#3 __________________________________________________________
Mundy says:
"Here's my stamp. It's actually a double stamp. I had bought the honey comb blue thing at the supermarket, it's a rubber thing to put hot stuff on, to make casts of hexagonal tiles. After reading the stamp article I figured I could use it as a stamp tool. So I stamped the white milliput with the rock first, to give it texture, and then pressed it with the blue thing. I have attached extra pictures with the process. I also have a smaller pattern one, but I'm not sure I like it as much. Greetings from Puerto Rico, Mundy"


!

#4 __________________________________________________________
Allan says:
"I used miliput as my putty. For the base I took some medical stretch bandage and rolled it over the base putty. The stones went a much different route. I had this chunk of fiberglass resin that I poured onto foam a long time ago. This odd resin stone was in my garage one day while making a silicone mold and some extra poured on top of the resin. That silicone was used to texture the stones."


!

#5 __________________________________________________________
Need More Siesta says:
"Hello, Roman and MV crew, this is my attemp to the Stamp Quest, I choose the one made with my slipper, some alien planet temple pattern (maybe). Thank you for sooo much insane quality stuff, I want to be like you when I grow up. I will add a lot of pics for more inspiration. Lots of hugs from Spain."


!


#6 __________________________________________________________
Martin says:
"Hi you people in the jungle,
thanks for your very good competition and even better way how to find out new ideas of 'basing' - hope you will show us, too :-). The only one problem I have is you want me to choose the best one of my stamps... but which one?
No, just kidding. I think we will celebrate Easter and that means we will probably have many Easter eggs and the question is what we will do with shells of empty eggs? What about use them as a base for the base under our miniature? :-)
We can glue it directly onto the pedestal (it really looks very well). OK, it's really possible but there's no stamp, is there? I even think if we make a stamp, it will look different - there will be no sharp edges. And you can use it for you ground, decorative wall...
To make such a stamp, I used the Siligum moulding paste - if you make a stamp you can stamp any putty (White-grey Milliput is used on the picture) for dozen times. You can be sure your base will never be the same because you can really stamp it as many time you want on the same (already stamped!) base. Well, till the putty isn't dry and hard. :-)
Hope you will find it useful and will collect all the shells from your Easter eggs."

!

#7 __________________________________________________________
Terry says:
"I did as suggested and went a little crazy. Here are the pictures of my efforts. The one I will be using is the last one which is simple but I enjoy it. I call it 'Landing gears' Its the one that shows the objects used next to it. Thanks for the fun and new ideas. Regards, Terry."


!

#8 __________________________________________________________
Michael says:
"Often you see small things that would fit perfectly on a base. Some small details from a huge piece that is not meant to be butchered for a base (things you find in your home and your girlfriend would not be happy to find them "partially" intact after creating your base) or from a material that cannot be shaped properly for a base (cement, etc). To still be able to use those elements in a base something needs to be done: so the topic would be making your own stamps instead of collecting them.
The idea behind this is to create a stamp that is neither time nor money wise expensive, can be reused and modified after creation. By accident a friend stumbled over a material that some of know from the past. It is foodsafe, smells and tastes a little bit like bubblegum: dental kneeding silicon (used by the orthodentist to create moulds of your teeth for those damn braces). Big advantage is that curing time is only around 7 minutes and mixing of the components can be done blindly... First get something that you want on your base. In our case a small candle holder should be used (but not be destroyed) to create some kind of sunken jungle (hint hint) base. The ball gets kneeded with hardener and than simply slapped on the face like a facehugger). After ten minutes (dinner time) the material is hard and the big focus of the sunken temple base can be stamped. Before the stamp material is 100% cured it was wacked a little bit with a hammer to create the crevices of broken stone running over the face. Rest of the base was done the "classic" way using cork and stone fragements. At the end another big advantage of the material was used. It can be shaped with a hobby knife or simply broken apart with little effort. This way parts or modifications before stamping can be done. Additionally the broken edges look perfectly like stone and can be used to stamp the rest of the base. Finally the result with a little bit of Soil/earth added."


!

#9 __________________________________________________________
Jak says:
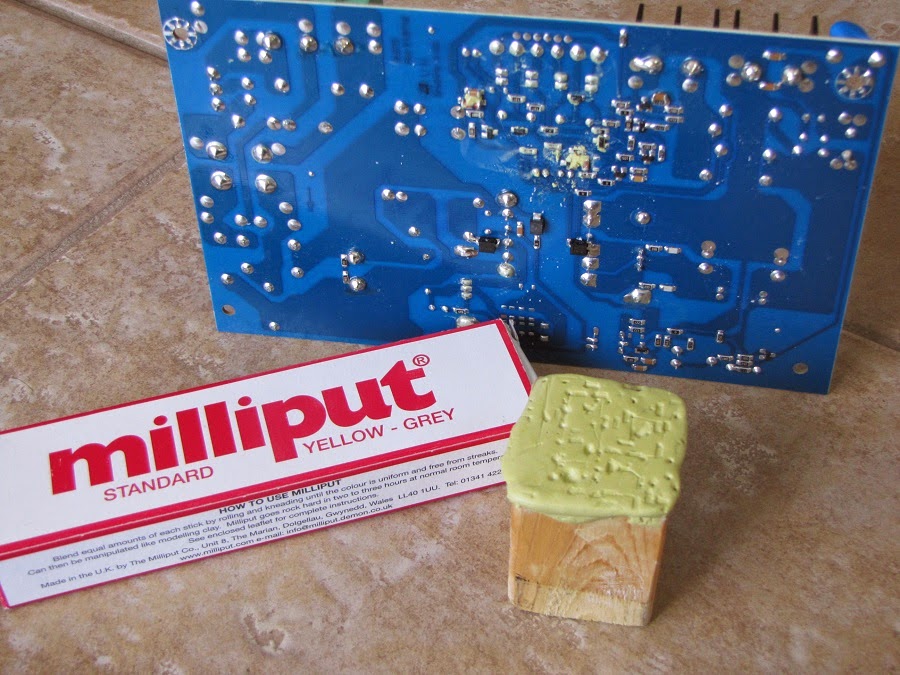
"So I "borrowed" a $200 power supply from work and attempted to make
a scy-fi circuit board stamp for a base of a scy-fy mini. First thank
you for this quest as it taught me about milliput and how good the stuff
really is, and for teaching me about stamps. Secondly, boss....if your
watching or reading this for some reason please don't fire me.
-Jak-"
!
#10 __________________________________________________________
Dez says:
"I love the work done by the massive voodoo group, I regularly follow your créations.bravo for your energy and creativity! I think you see the Painting crusade, to be filled eyes ... pity ^ ^. here is my participation in micro challenge STAMPS quest ^ ^
milipute + footprint on hand ^ ^.
simple and effective for texturing Leaf tree ^ ^ style.
good luck and congratulations!
ps: sorry for the rotten English, but it is the goggle translation ^ ^.
KISS
DEZ"


!

#11 __________________________________________________________
Dave G says:
"Here's my entry for the stamping contest.
I took it as an opportunity to create a mold making tutorial, but here's a few of the progress photos.
Was having a problem deciding what I wanted to use and had been keeping
an eye out for inspiration. On a cold day, I had a hot chocolate and
looked at the lid after removing it - it was covered in foam but the
pattern looked rather "alien." Since I would've crushed it with green
stuff, I made a mold. In retrospect, I should have painted varnish over
the dried chocolate to hold it together because unfortunately it broke
apart a bunch while the latex was drying. Still got a couple good
stamping spots."


!

#12 __________________________________________________________
Wendy says:
"Here is my entry. I wish the pics were better, but the baby sleeps in the room with my light set up and I only had a little time... One base is a cobble stone and the other, well, it looks a bit like a whirlpool. This was a fun quest. Cheers, Wendy"
!

__________________________________________________________________________
________________________________________________________________
________________
Well, that's it!
Thanks to all the ladies and gentleman who took the challenge of the quest, who did not fear to collect stuff and stamp it. Those who did - yeah I mean you - you will see that this will bring you further joy for your hobby once in a while - Experience can never be taken away again - you are already all winners!
But, we got to choose and judging work begins now and will take some days!
Stay put!


Hi guys - just to let you know I use same stuff Roman is using so no point sending photos, but some of stuff is briliant and will definetely use it in future!
Roman are you planning to go to Salute? in london?
Thanks for sharing! It's really very helpful - I would have hardly imagine something of it but when I saw it on the pictures I have to say it's just worth trying and do it on bases. Thx again.
Oh right I totally forgot to send a description in English! x.x I will just make it really short.
I used a bunch of things like pen holders, wheat, a toothbrush, lace, dice, a sponge and paint bottles. The lace and pen holders made really cool dragon scales, I was impressed how good they looked. But my favourite one was the toothbrush.
The result looks like a really destroyed surface, like demon skin, rotting flesh or heavily wheathered metal. An effect you can use for many many applications and a toothbrush is something everyone has at home or even already with your painting stuff for making splatters etc.
So that was my favourite! Sorry for the only German but very long text Roman and wow all the stamps look so cool! Congratulations everyone you have been very creative!
Greetings Lena
Thanks for this inspiration #3 and #6 is for me the best. I MUST try this two techniques
i use my beard to make fur texture in milliput.works surprisingly well.
@Evansn79
Got to try that :D
@Minillena
Added your english text - thank you! :)
@Radegast
No Salute for me this year ... one day I will be able to go there I hope!