


posted by roman, jarhead, kong

Welcome Jungle visitor,
welcome to another Step by Step article.
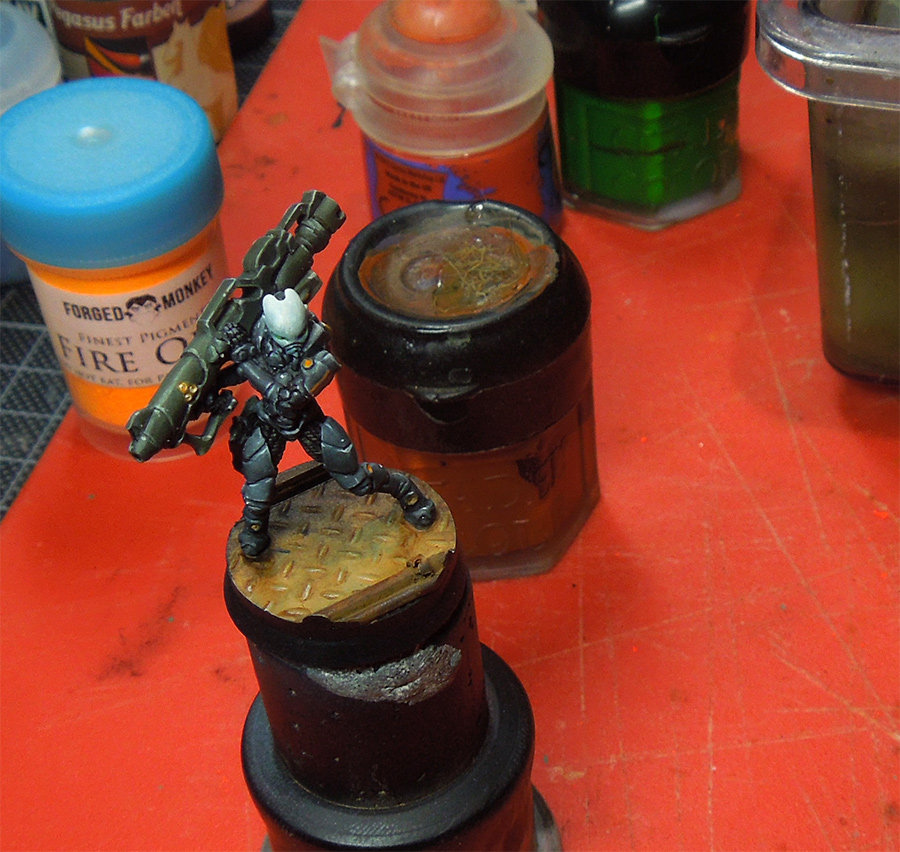
This one is about a Yu Jing, Hac Tao, Infinity figure in 28 mm.
The figure was a test for my own gaming figures and I wanted to paint it simple but effective without taking days for it. I am really convinced that there is a difference between gaming figures and competition display pieces. Do you agree with that? I just would be too scared to touch my miniatures all the time and maybe even drop one in the heat of the dice battle. If you are interested in a little preparation talk of the figure, check this article!
In the end the whole figure took me around 4 hours to complete, including the base. I was happy with the result and the time it took me. Test went well I would say and more miniatures to come in the future. It was very important for me to write this Step by Step now as I am sure to forget my colours I have used for the model. I hope this article will prevent this and you readers might enjoy it.


Nothing special about the priming process.
If you want to get a deeper view, check this article:


Welcome Jungle visitor,
welcome to another Step by Step article.
This one is about a Yu Jing, Hac Tao, Infinity figure in 28 mm.
The figure was a test for my own gaming figures and I wanted to paint it simple but effective without taking days for it. I am really convinced that there is a difference between gaming figures and competition display pieces. Do you agree with that? I just would be too scared to touch my miniatures all the time and maybe even drop one in the heat of the dice battle. If you are interested in a little preparation talk of the figure, check this article!
In the end the whole figure took me around 4 hours to complete, including the base. I was happy with the result and the time it took me. Test went well I would say and more miniatures to come in the future. It was very important for me to write this Step by Step now as I am sure to forget my colours I have used for the model. I hope this article will prevent this and you readers might enjoy it.
Step 1 - Priming


Nothing special about the priming process.
If you want to get a deeper view, check this article:


A view on the jungles priming methods.
Step 2 - Basic colour at main areas

I used a mix from Model Colour black and Andrea Miniatures german field grey for the first apply of the armour's colour. I applied the tone two times to recieve a good saturation and avoid dirty places where the priming might look through. Wait until every of your applyment is dry, before placing the next. If you don't you can rip colour off again and/or damage the surface.
After looking at the photos I could have done this process maybe a third or even fourth time, but decided to not do so, because it's a gaming figure. I would handle it different for a display piece because of a uniform surface in the start, youare able to paint in higher quality later on. I already had in mind that I want the colour to go brighter in its highlights. That is why my basic tone is still more black than grey.
Step 3 - Go ahead with main areas


I took some pure black to paint the areas between the armour parts (the neo-techno-fiber-carbon-material that allows movement). A mix from black, german field grey and Model Colour Air USMC Green was used to paint the basic tone at the rocket launcher. A mix from Citadel's Ice blue and a drop of the german field grey was the basic for the helmet. I applied those steps again for several times.
Step 4 - Main Area basic tone finish

The last big main areas was the base. I decided to take some Citadel's Dwarf Flesh mixed with a drop of the german field grey for it. As far as I can remember and reconstruct from the photo above there was also a drop of strong green going into it somehow. I decided to make this area so strong because I already knew that I will dirt it down in the following steps. I applied this step again for several times.
Now the basic tones are all prepared and painting the areas truly starts.
Step 5 - Bringing some dirt to the base

I used Model Colour Smoke thinned with water to put it up to base in several layers. Again let each layer dry. To intense the tone in specific areas apply more layers. I did so in the back of the base or let me say the area of the base which is behind the figure.
Step 6 - Starting with bright edges

I went back to the basic tone of the armour and added a small amout of white to make it brighter. Just a little bit. With this mix I did paint the armour parts that are hit by zenithal light. I mixed in more white for some edge highlights. Same to the basic tone of the helmet. Two glazes of pure USMC green was used on the weapon to intense the tone there. Pure white was used in all places where I plan to bring on dayglow color soon.

A guide that shows you how you can bring your miniature into a good light situation.
Step 7 - Starting with details

Forged Monkey Dayglow colors were used to be put on the white areas. During this step I used a glaze of pure black to put it in the shadow areas of the armour to intense its overall contrast.
Step 8 - Detail work goes on

Pure white was mixed in the basic tone of the weapon and edge highlights have been done, again under the rule of zenithal light. I did use a glaze of green and black to bring back shadows on it, like the way I did on the armour. The pure white on the helmet was done again and again in several glazes to get more power. I did final edge hihglight with pure white at the armour and on small areas like the chest I added small white dots to show reflections and make the area more interesting. Gentle highlights on the base have been painted at the base area in front of the figure. A wash from Citadel's Bestial Brown was done on the rusty areas and some self made rust pigments where put in place there. Bestial Brown with a small drop of white was used to paint the insignia lines on the figures shoulder pad. I used a graphit pen to bring some metallic places to the rusty pipes and the black areas in between the armour. This is quick but really brings fast detail.
Step 9 - Final details


Tamyia Clear Smoke was used to bring on some oily areas to the base. Crackle paint was used to bring in some bright area and difference to the base. After this was dry the next step was glazing these areas of crackle paint with smoke again. Additional I added a glaze of orange pigments to the pipes and the figures feet.
I can remember I did some more detail on the edges and small dots with pure white and a fine detail brush. Satin Varnish was used as a glaze on the helmet to show the material different from the one of the matte armour.
Step 10 - Finished!


Well, I have finished my first personal gaming miniature in 4 hours.
That was quick and I am happy with the result. Can't wait to see my army rise. Please make sure that this article is not directly a step by step guide with a color recipe. I don't like color recipes as I forget them most of the time. It is more a view on my way of working during finishing this figure and what effects I have used to get a quick but good looking gaming result.
Additional I got say I was very proud of myself for achiving this result in this little time. I can't promise that it will happen to you on the first run. During the progress I really felt the experience of painting a lot of figures over the last years come together when it comes to achieve nice areas and quick good effects. Nothing too fency for sure but in the end a start for my army painting scheme.
Maybe over time and after many battles fought there will be some addition with armour weathering or detailed freehands, but my gaming figures got to earn this upgrade in the heat of the battle first.
I hope you liked this step by step. Let me know your questions, ideas and thoughts via comment.
Soon more! Stay tuned and keep on happy painting!
Best Wishes
Roman


This is excellent, Roman! Thanks. Interesting to see that on this mini (and more aiming for speed than for top notch quality) you work from dark to light - quite different from your normal approach, right?
Thanks again. Best, David
@David
Thanks! About your question: Depends on the final look of the figure. If it's planned dark, it is good to start dark. If it's more bright, it is good to start bright.
Hi
Thiel is a real exelence Work for 4 Höhe
Congratulation and happy painting.
Oh sh*t T9
Hours not "Höhe"
:$
4 hours? That would have taken me all day and it still wouldn't have come out as good. :) I love the whole model but the base is especially nice. Thanks for the tutorial on this one.