


Good Morning jungle people,
again, Tutorial Voting was held and you decided once again against the pirate's fate.
Massive Voodoo's year of the painter brings you the build up of a "Wasteland-Base" with this article. I hope you enjoy and have a good read. Let me know your thoughts, ideas, questions and impressions in the comments.

Introduction
Well, first when building up a base you need a plan. Not a perfect, exact plan, but one that tells you your "theme of the base". For me this time it was "Wasteland", ... it does not matter if it is after the Zombie-Apocalypse or after the scenario of Nuclear blast that rained down on humanity. What I wanted to show is a harsh world, a grim place, a place where survivors struggle to stay alive. A scenario that shows death can be permanent and known structures are just a far memory.
You will find this article seperated in "Composition thoughts" and "Material". Seperated so you can see exactly what I am trying to tell in this part of the article. Hope you enjoy!
Composition thoughts
I took a wooden plinth and decided to have some basic three levels on that base. A difference in height. So I took my saw and worked to cut out a stair in the front part of the base. After some minutes using the saw I decided to switch to the forceps and break off the part I just started to saw as I was to lazy to work my way through the wood with the saw. I was happy with that "luck shot" that occoured, and placed the piece of wood that was left on the base too.

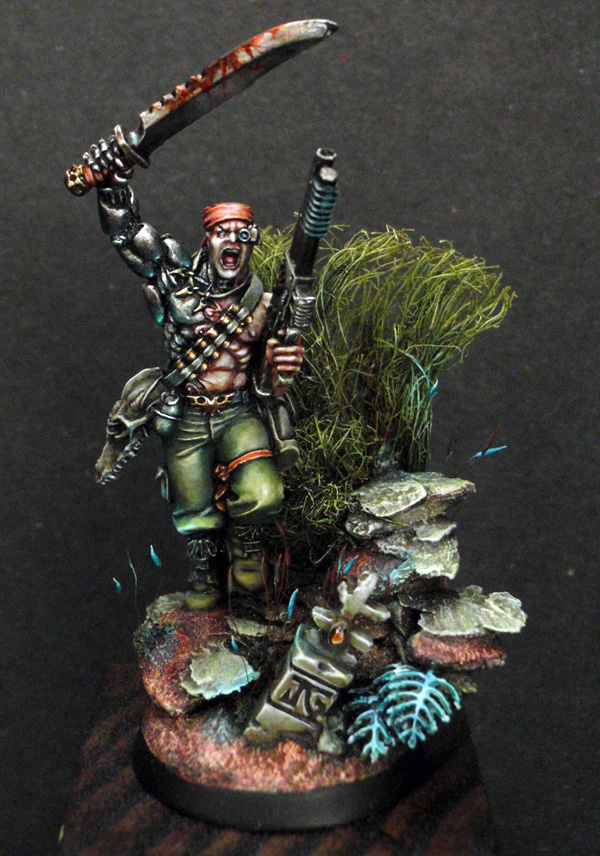
I already enjoyed how this turned out. Why you might ask? Well, you need a theme for a base and a miniature. The Miniature I plan for this base is GW's Col. Straken, here you can see a cool version from Julien Casses. If you look on the figure's pose you can easily spot that his ambition is to run forward and fight someone or something. If you look on that base from above I am able to give his dynamic pose more fortitude as the basic parts already show a very nice window for the figure's position:


The base is opening up to the frontside of the figure's movement directio. It gives a frame, a focus to it. This settled it was time to start the build up of the "wasteland". If you are interest in more information about basing composition thoughts, check back with this article.
Material
Again I used wall plaster for the white stone sheets, Juweela bricks for the ruined wall parts, some hobby corrugated metal, a skull (permanent death-danger-message), used some plastic pipes and steel girders. And of course my favourite tool to build up bases: Superglue! The plastic steel girders have been set to fire with a lighter - carefully of course - and have been bent while still flexible.

Composition thoughts
At this stage I checked back with the focus aspect of my base. Changing the angle of my view on the base. As you can spot now the direction of the pipes and the girders give the initial frame of the base a second one, build up with material:

Material
Well, it was time to build up some more of that "wasteland".
Recently I found cool chairs for the scale of 28 mm, added some real metal, rusty parts I found on the street and applied metal foil to some of the pipes to make them look more interesting and real. I applied one of PK-Pro's nice edged signs and chose "MOTEL" here as I felt it will fit well to the chair. This once has been a simple motel but everything got ruined.


The metal foil is pretty cool as you can bent it easily over any surface. Check Raffa's Giu's Robot repair article and see more of the use of it. I used some pack-twine to pull some of it around one of the girders. It is planned to be some rusty wire later on. I can not exactly tell you why, but I love such small details and I just keep rolling with this base and don't want to stop in the middle of work.
Thinking about realism helps to add a little detail and I took some screws from PlusModel to the holes I drilled into the "MOTEL" sign. The lower one still inside, the upper one close to fall off ...

First, lets have a look on that base now. Well, that is it. I still will apply some soil and rubbish on it, but I am tired of telling and showing you that I threw some soil on a base. It is not difficult at all. Its purpose will be blending all parts together and closing this build up. Check this article to get into it!

Composition thoughts
If you did read the introduction about basing composition with care you will see what I am doing right now: Doing the cutaway and checking for the main spot where the figure will be placed, looking inside the face of the figure to see the front side of the base.

Closure
The base in this article is still without soil, without paint, without figure, but I as I took the base to the latest painting class to start painting it there as demonstration you can be sure to soon see some photos of its progress in the jungle soon and some explanations and experiments on rust too ;)
Why do I not show it in here?
Well, I don't want to mix up too many topics, avoid to mess up your brains and soil is really easy to apply (Honestly, I just did forget to make a photo of it).
I hope you enjoyed the article,
keep on happy basing and painting!
Best Wishes
Roman
again, Tutorial Voting was held and you decided once again against the pirate's fate.
Massive Voodoo's year of the painter brings you the build up of a "Wasteland-Base" with this article. I hope you enjoy and have a good read. Let me know your thoughts, ideas, questions and impressions in the comments.
This is where we are heading in the article ...
Introduction
Well, first when building up a base you need a plan. Not a perfect, exact plan, but one that tells you your "theme of the base". For me this time it was "Wasteland", ... it does not matter if it is after the Zombie-Apocalypse or after the scenario of Nuclear blast that rained down on humanity. What I wanted to show is a harsh world, a grim place, a place where survivors struggle to stay alive. A scenario that shows death can be permanent and known structures are just a far memory.
You will find this article seperated in "Composition thoughts" and "Material". Seperated so you can see exactly what I am trying to tell in this part of the article. Hope you enjoy!
Composition thoughts
I took a wooden plinth and decided to have some basic three levels on that base. A difference in height. So I took my saw and worked to cut out a stair in the front part of the base. After some minutes using the saw I decided to switch to the forceps and break off the part I just started to saw as I was to lazy to work my way through the wood with the saw. I was happy with that "luck shot" that occoured, and placed the piece of wood that was left on the base too.
I already enjoyed how this turned out. Why you might ask? Well, you need a theme for a base and a miniature. The Miniature I plan for this base is GW's Col. Straken, here you can see a cool version from Julien Casses. If you look on the figure's pose you can easily spot that his ambition is to run forward and fight someone or something. If you look on that base from above I am able to give his dynamic pose more fortitude as the basic parts already show a very nice window for the figure's position:
The base is opening up to the frontside of the figure's movement directio. It gives a frame, a focus to it. This settled it was time to start the build up of the "wasteland". If you are interest in more information about basing composition thoughts, check back with this article.
Material
Again I used wall plaster for the white stone sheets, Juweela bricks for the ruined wall parts, some hobby corrugated metal, a skull (permanent death-danger-message), used some plastic pipes and steel girders. And of course my favourite tool to build up bases: Superglue! The plastic steel girders have been set to fire with a lighter - carefully of course - and have been bent while still flexible.
Composition thoughts
At this stage I checked back with the focus aspect of my base. Changing the angle of my view on the base. As you can spot now the direction of the pipes and the girders give the initial frame of the base a second one, build up with material:
Material
Well, it was time to build up some more of that "wasteland".
Recently I found cool chairs for the scale of 28 mm, added some real metal, rusty parts I found on the street and applied metal foil to some of the pipes to make them look more interesting and real. I applied one of PK-Pro's nice edged signs and chose "MOTEL" here as I felt it will fit well to the chair. This once has been a simple motel but everything got ruined.
Have a seat!
Metal parts and chair applied ...
Motel and metal foil applied ...
More metal foil ...
The metal foil is pretty cool as you can bent it easily over any surface. Check Raffa's Giu's Robot repair article and see more of the use of it. I used some pack-twine to pull some of it around one of the girders. It is planned to be some rusty wire later on. I can not exactly tell you why, but I love such small details and I just keep rolling with this base and don't want to stop in the middle of work.
Thinking about realism helps to add a little detail and I took some screws from PlusModel to the holes I drilled into the "MOTEL" sign. The lower one still inside, the upper one close to fall off ...
First, lets have a look on that base now. Well, that is it. I still will apply some soil and rubbish on it, but I am tired of telling and showing you that I threw some soil on a base. It is not difficult at all. Its purpose will be blending all parts together and closing this build up. Check this article to get into it!
Composition thoughts
If you did read the introduction about basing composition with care you will see what I am doing right now: Doing the cutaway and checking for the main spot where the figure will be placed, looking inside the face of the figure to see the front side of the base.
Closure
The base in this article is still without soil, without paint, without figure, but I as I took the base to the latest painting class to start painting it there as demonstration you can be sure to soon see some photos of its progress in the jungle soon and some explanations and experiments on rust too ;)
Why do I not show it in here?
Well, I don't want to mix up too many topics, avoid to mess up your brains and soil is really easy to apply (Honestly, I just did forget to make a photo of it).
I hope you enjoyed the article,
keep on happy basing and painting!
Best Wishes
Roman


Already feeling the mojo! Thanks for the great tut ;)
Bookmarked, and saved for current project. Damn.. you make this look so easy... argh.. Now to get back at the workbench to work on my own!
Well, I miss the pirate tutorial :-) but "Wasteland-Base" is "Wasteland-Base" .... Better one had to win...
Thanks for your response, gentleman - also in private ;)
That is what keeps me rolling. Looking forward to see what you think of the next Tutorial Vote :)
Happy to help!