


Hello Ladies and Gentleman,
today Roman will speak about his progress on one of his latest bust:
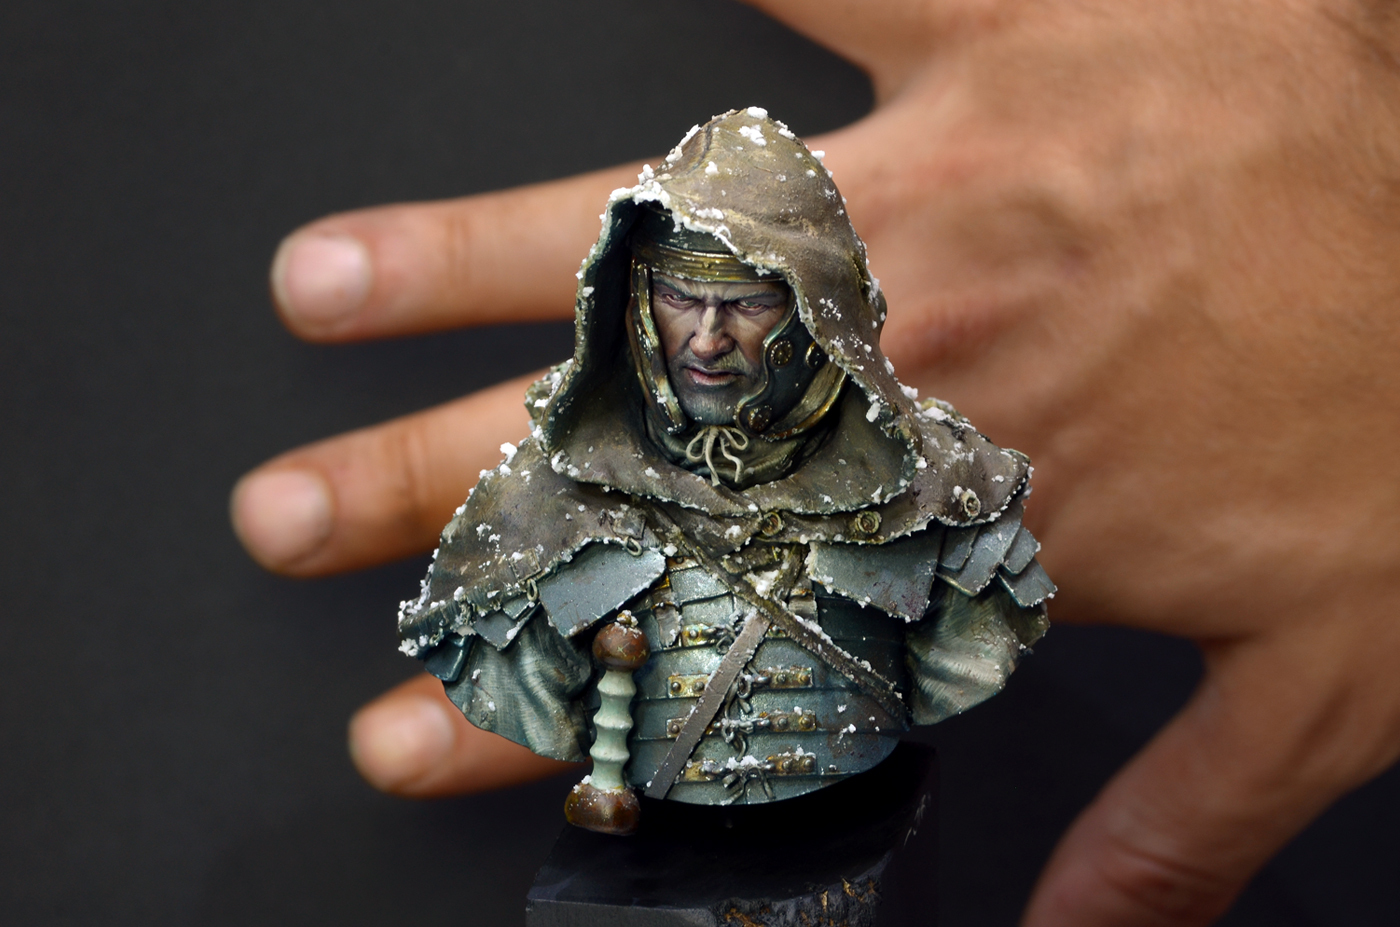
The Aquila - Hero of Rome 41 A.D.
If you are a constant reader of MV you might know that Roman is truely into ancient Rome, reading a lot of books about it and enjoying to drift away in his mind to ancient glory or not so glory. Depends on the perspective of events. Well, once in a while it is a good thing to let impressions out into a model or a drawing or a painting. Roman did so with this bust.
It was planned that this bust is the second one in Roman's long term goal to have a display with several ancient Roman models. The first one is the Roman Legionary he painted a while ago. Roman did not plan to sell any of those as he already was proud that the collection was at two figures.
Well, mysteries happen and the Aquila here was shipped to China last week to a miniature collector.
Now the plan to make that display grow lost 50% of its volume. Ouchy!
Well, let's stay with the facts: If miniature painting is your daily life, your work you have to pay bread and rent from you paint figures to sell figures. And sometimes you just can't say no to a good deal for both sides of the bargain.
Enough of these emotions, maybe one day he paints him again for his collection. Another version, another day. Now we head over to the article and jump right into Roman's thoughts ...
____________________________________________________________________________

Step by Step: The Aquila - Hero of Rome 41 A.D.
Foreword
Every Miniature I paint comes from the heart.
Some are more important for me than others as the topic or the theme of the model is just the right one which occours my personal interests. There is no big plan in doing them, I just see a model and know this is it. It calls me to put in my emotions and it was the same with this beautiful bust by Nuts Planet. You can find a Miniatures Unpacked about it here.
As I am used to do many photos during MV's year of the painter to write article after article for our readers and jungle visitors it was no different with this one. This always takes time: Doing the photos while working, making them ready for the article, preparing and writing the article. If you have some spare coins for a coffee for the work that is put in here for you to read, please feel invited to say thanks via a jungle donation.
Painting Progress
Well, now to the topic. Painting Fun.
This article will show you the steps I took through the model and gives you insight in the thoughts behind the steps. Sometimes I feel bad not being able to tell you every single colour I used in the progress, but honestly I just can not do it as I do not remember them on my own. When I am in the midst of painting fun, I am happy to be able to remember to do the photos for the article and colours, brushes, airbrush, dirt, etc. is just used without proper names. As I am not a big fan of colour recipes at all this way of explaining suits me better as I am a believer that using too many colour reciepes often blinds you to the endless freedom colour can bring you. Ok, now I hope you enjoy the article.
For me it is always important to know why my models recieve the colours I paint, so it is good to get into the right mood by thinking about what the models story is. The reasons why he/she is somewhere? What is he doing there? What has he done earlier? Is he exhausted or relaxed? What daytime is it? Where is he located?
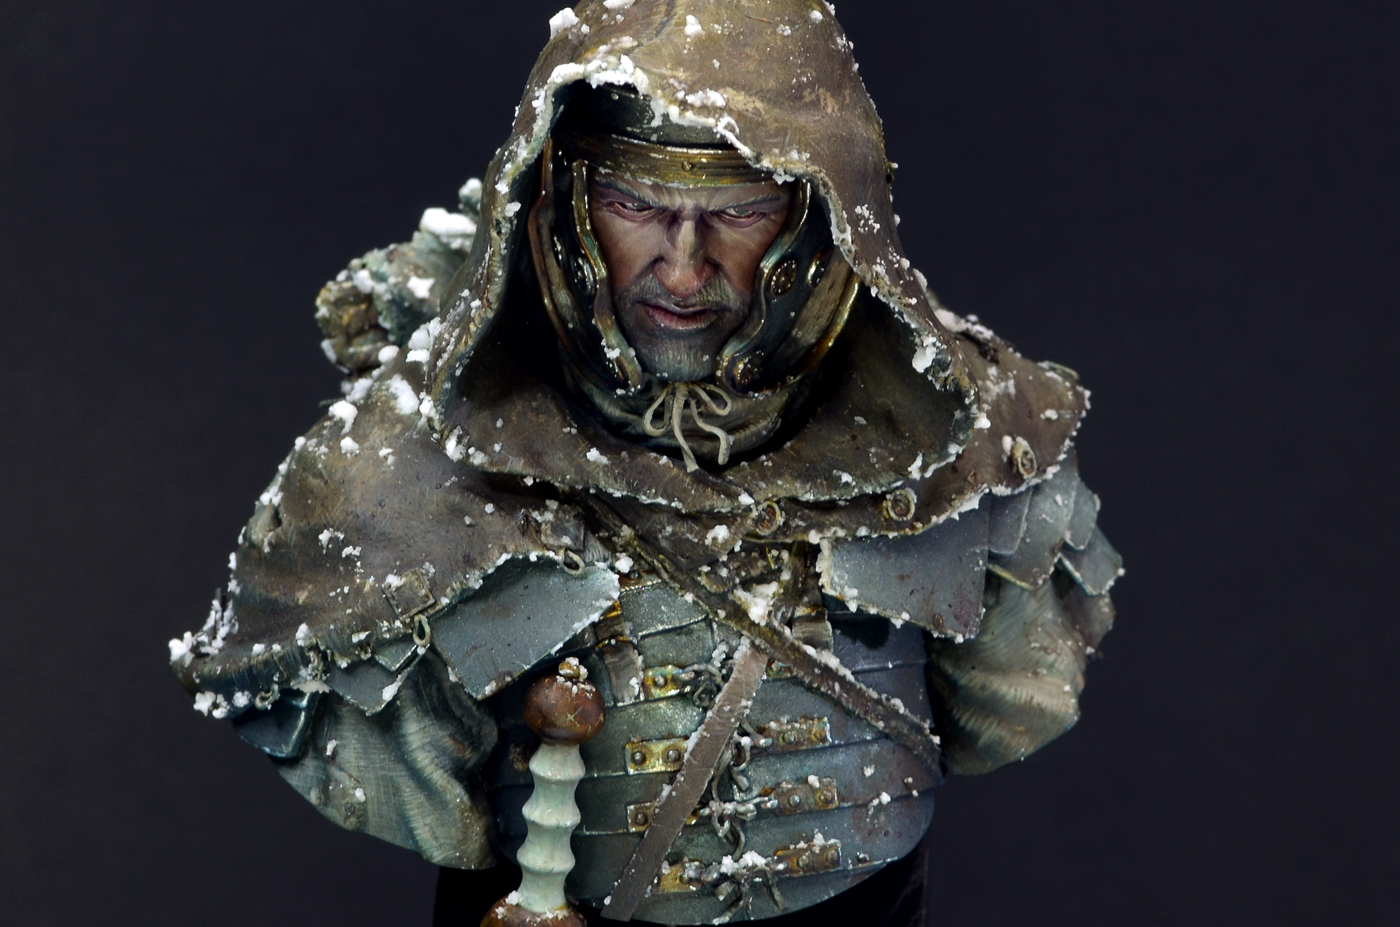
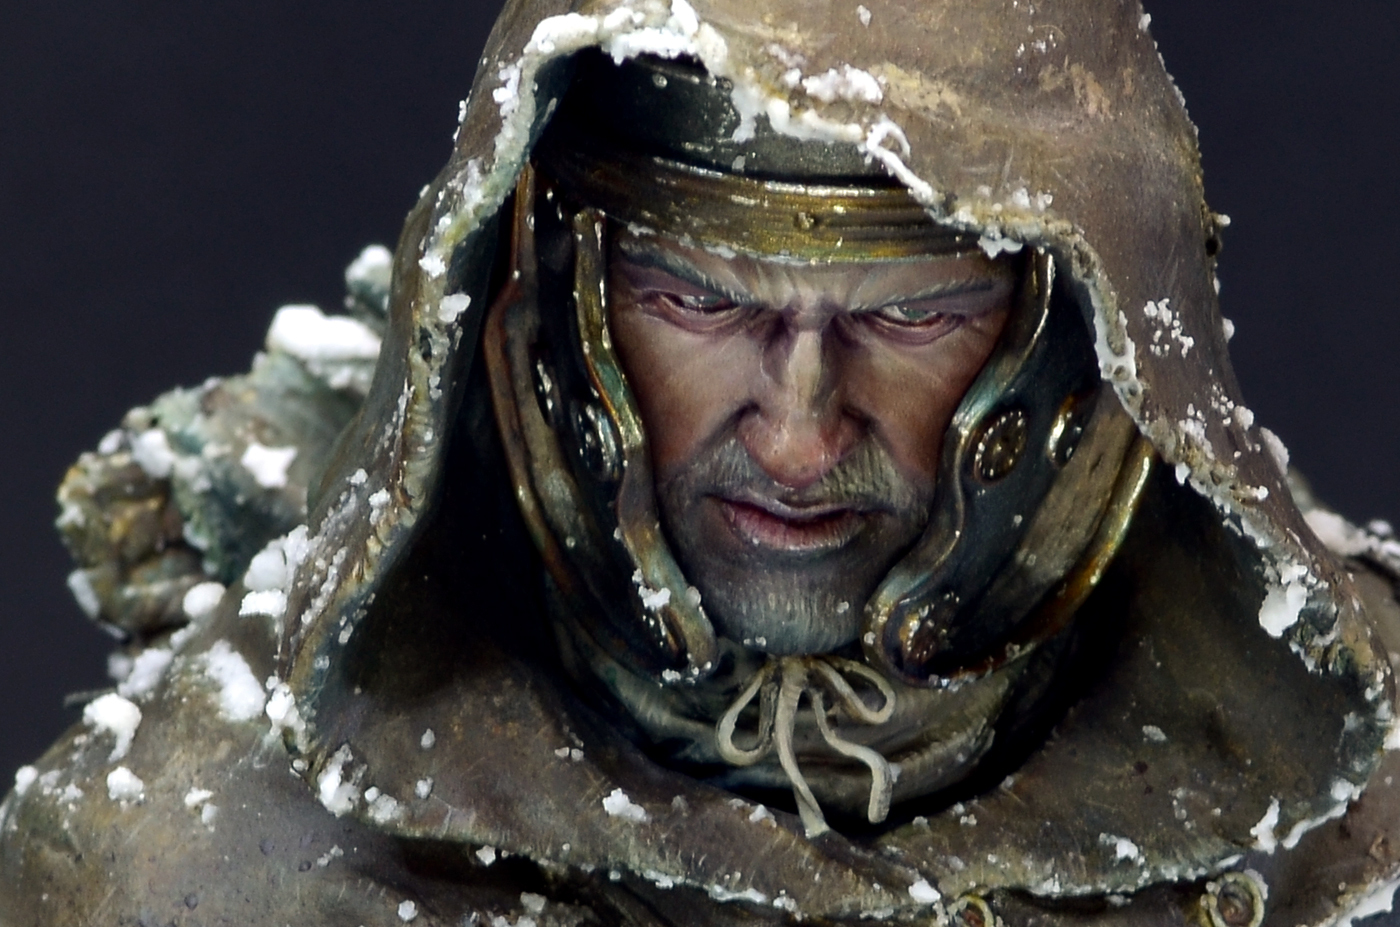
I imagined my roman hero somewhere in a gentle snow storm of an early winter morning somewhere in Germania. He and some other lads had a really though mission. Retrieving a legion's eagle from an unfriendly barbarian tribe who stole it in a battle many years ago. Recently a spy informed the Empire about the possible location of that eagle and so the hero and his small group of trusted friends were sent to the place. Careful to avoid contact with the enemy at all cost, stealthy, invisible until the location of the eagle was confirmed. Not an easy task. Long story short, the eagle was stolen back again, but at a high price. They had to kill and they died. He is the only one returning home from this mission and he is still on his travel to safety.
To catch this emotion I started with my basic colours really cold. I know this looks like painting madness but it was fun. Throwing colour there to just get into it. The face was done first via airbrushing sunny skintone from VMC. The rest of the sketch was done with the brush. Bam! Bam!

Ok, after my initial painting madness calmed down a bit, I used many brown washes to get the right colour for his leather cloak and his hood. Did the leather parts on his armour. I painted the basic colours of metal to the bust and used all earthy sandy tones to recieve a sketch on the fabrics too.
The face recieved some strong shadows too while I worked with the washes and some first light sketches have been painted to the face. Eyes black.
You might ask: Why did you start with the blueish colour on that cloak at all?
Well have a closer look, it still is visible in the shadow areas.

Still at rough work I am. Sketching some textures on the fabric with brighter colour. Additional information to the following photo: I started the bust on a work-plinth and will change it later to the bust plinth.

Checking for prominent spots on the face and put some more work in them by applying the colours more often to recieve an opaque look.
Also adding thin colour glazes (reds/purples/oranges) to the eyes, nose and mouth.
I learned about facial colours while I studied to paint dark/black skin at Juva.
In fact this is also happening in brighter skin and I learning more everytime I paint.
Eyes have been sketched white and the pupils were sketched with black.
Sorry for the blurry photo.

Well, good for the sketch now. As the leather cloak is really a big part of the model I decided to start with this first by working more detailed on it. Using Army Painter's strong tone I decided for a really worn out look on my leather work as a start.
Doing just spots out of the bottle to the model.

Dry them for some seconds with the hairblower.

Take a wet brush without colour to remove the inner colour that did not dry ...

To recieve random dirt spots on your old worn out leather. I now again used brown and even green glazes to add more colour to the cloak. I enjoy t work on leather parts like this with layers. Creating different textures and pulling them together with glazes again, then do it all over again to recieve really interesting layers and structures.
If you look close you might also recognise a structure on the hood and cloak which is not painted. I used Vallejo Putty 401 before priming the model and added some structure to this really old cloak. Why is it old? Roman's are used to look great and ... well, he stole it from a barbarian guard who stood watch at the eagle's hiding place and it smells like hell.

Next, another layer of structure and texture to the cloak, now using different sized sponges to recieve different sized texture with different looks.

Make sure the colour is not to wet if you apply such or you will not recieve what you are aiming for.


Use different bright colours to also install a light situation on the part you are working on.
Looks rough I know, but feels great to do :)

A little voice in my head told me that I am loosing the cold look I am aiming for in the whole bust so I took the chance and used some masking putty on the face before spraying thinned blue/tourquise with the airbrush. Gentle.

The aribrush work already helped to calm down my texture work everywhere. Just a little bit. More was needed. Now patience was up on the plan again. Working with glazes. Bringing it all together once more. I used mainly different browns, from yellow browns to red browns, greens and a little purple.

The glazes were really thin - as you can see in the upper example - and I applied many and can not remember how long it took me. Felt like ages.

Four things I prepared to be painted seperatly: The helmet's check protecotrs, the gladius handle and the rope part with whom the cheek parts are closed. I used blue tac to prepare them on a piece of cork.

After the face recieved some more attention in working out more prominet details I painted those parts and glued them in place. But not the gladius for now. You see I also used some blue glazes here and there in the metals to show the reflections of the cold environment. If you plan to paint an athmosphere do not lose it. Take it to all the parts, no matter how small they might be.

While I was working on his beard with thin brush strokes to recieve hair texture there I also worked again on the leather cloak and the fabrics with some more detailed textures.

Now it was time to close into more detail work and with that I mean careful work. So let's start with some dirt. This hero of Rome is hunted through the deep winter forest and is going in a strong pace. So I thought it might be realistic to show some dirt on him.
Using matte varnish, soil and brown colour I mixed this paste:

And applied it. The matte varnish in the mix will keep it in place. I also switched the working plinth to the final bust plinth that I put to fire. Click photo to enlarge.

With some help of red wine I found bravery to apply more colourful thin glazes to the face to make it look more alive. Purple, pink, reds, orange. Plinth was painted black to have a better vision of the final result.
Right now I already enjoyed the cold athmosphere everywhere on the model.

Well, time to do a break on the figure and go for that gladius. The wood parts were painted with chocolate brown by Hobbyline. A very matte colour range that is highly recommended when you look at the quality and the price/amount part of the bargain.
I did not paint it totally opaque as I wanted to keep some of the texture I did put before by drybrushing the piece.

Inked with Scale75 Inktense Wood.

Now more or less careful, using my fingernails to add some scrateches to the wood parts. I try to only "hurt" the upper layer of ink.

Well, I was not sure if this worked well, so I decided to go for some snow finally. I decided to apply a version of the snow you can also find explained in the article about masterclass snow.
These materials were used: White texture paste for volumes, bicarbonate of soda for tiny flakes, crushed glass for some glitter effect and some white powder which I forgot where it came from - I think Battlefield-Berlin - which also has a little glitter effect in it. Yeah, white powder I know what you all think.

Well, I quickly decided to not work with the texture paste on the roman hero as I did not want to hide him in thick volumes of snow. I did a mixture of satin varnish, bicarbonate of soda, crushed glass and the white powder stuff. Mixed all together. Why Satin Varnish? Well, I did not have any matt varnish at hand and wanted to give this a try if it looks more like fresh snow which is still some kind of wet. You can also go with matte varnish here, but I do not recommend using gloss varnish as this might bring you looks of a lot of wet and shiny places to your model.

Now important is to decide the direction of the snow fall. I went for about 8 o'clock from the Roman's face. Maybe a little symbolic angle: He leaves the cold and danger behind, eh?

Think about where the snow might stay. Do not just throw it on top. This will take time but it is worth it. First careful.

When you are sure what you are doing and know about the direction of it, do it more aggressive but still careful.

Final Steps after the snow where checking back with areas I want to clean up and sharpen further. I'd say this was about 6~7 hours of brushwork still to make everything like I wanted to see it. Increasing contrast here and there, applying more colourful glazes to make some areas more interesing. Did so mainly on the skin and leather.

You can find more photos of the final result of "The Aquila - Hero of Rome 41 A.D." on Putty&Paint.
You can find this step by step article linked up to MV's article area, section Step by Steps.
I hope you enjoyed the article!
Keep on happy painting!
Best Wishes
Roman


Your passion for the subject really shines through. This is definitely one of your best. Thank you for taking the time to share your thoughts.
That's amazing. The face is incredible. The look is really intense!
Really great work. one of my favs from you roman, the snow adds a whole other dimension to the bust. great article keep up the good work. regards
Thanks for the SBS my friend :) I enjoyed reading it!
That is likely you best piece to date. Thanks for sharing.
Hi! Stunning piece of work!!!
There's a question looking at your painting process. One thing i didn't really understand all the time but perhaps you can help me now.
You gave the face a first colour and cover it completely with sunny skintone from VMC.
Than you did the highlights an the shadows. Now the question - why isn't the color you covered the skin at first (the sunny skintone) seen anymore.
Isn't this first color the same as the middletone everyone speaks about? Tutorials often say something like "....do the Highlights....do the shadows....never loose your middletone....".
If the sunny skintone is not the middletone, so why do you use it as a base?
Zu schwierig in Englisch - auch wenn es eine totale Anfängerfrage zum ganz grundsätzlichen Verständnis der Begriffe und Technik ist.
Wenn ich, nachdem Schatten und Highlights gelegt sind, nichts mehr von der ersten Schicht "sunny skintone" sehe, ist das dann noch der oft zitierte Mittelton?
Ich dachte man mischt dann zu dem "sunny skintone" (Grundfarbe = Mittelton ??)
z.B. 3 hellere Hautfarben für die Highlights und drei braun-/rottöne für die Schatten aber das "sunny skintone" als Mittelton bleibt immer als farblich unveränderte Fläche/Farbe auf der Figur stehen (außer natürlich an den Rändern/Punkten, wo eben die Lichter und die Schatten sitzen).
Wenn die Theorie, wie eben geschildert, richtig ist (was ich natürlich nicht weiß) warum wird dann der "sunny skintone" als "Grundlage aufgetragen, wenn Lichter, Schatten und Mittelton sich doch aus ganz anderen Farben zusammensetzen.
Ich hoffe ich konnte mit der Frage mein Problem verständlich machen und verspreche mir von der Antwort Quantensprünge für mein "Gepinsel".
Vielen Dank vorab!!!!! .....und Tchulligung, dass es nicht in englisch ging.
Thanks for your feedback, guys. Happy that you enjoyed the write up.
@Anonymous
You are right, in what you say. Why do I lose the basic tone of my skin? Well, I can not even explain to you. Maybe it is because that first stage of painting and preparing that bust is not a common way. No way with guidelines, rules or explanation. I just felt like starting my sketch with it and while I proceed I decided that it was too strong and changed it. There is not much left of the basic colour of sunny skintone in the end at all.
Hi Roman,
thank you very much for your answer!!!
It says, that i understud the Middletone-Highlight-Shadow-Thing right.
Big step on the way of a beginner.
Changing the heading on the way is a thing that shows to me how good you are.
Eine Figur während der Bemalung einfach "in eine andere Richtung zu biegen" zeigt Deine hochklassigen Qualitäten als Maler. Ich muss mich leider noch an "Hilfsleinen langhangeln".
Thanks a lot for all the time and thougths you share with us!!!!
GENIAL ...assolutamente geniale .. sei un grande Roman !
Giuseppe D'Alessandro from Italy
This is absolutely breathtaking. I realize I hardly ever comment, just feel overwhelmed by the beauty of your work, but this one is so special. Thanks for once again educating us with your process. Always something new to try :)
Wow looking at the beginning stages of this miniature, I would have thought this was computer generated! Such an eye for detail. I have never looked into painting miniatures much but after seeing this, I am very interested in learning more about the subject. I really appreciate this post! Thank you.
Brandi Bradley @ Rotax Metals