


Hello Voodoo people,
this week's Tuesday Tutorial Voting brought a clear winner:
Mostly everyone wants to dust-proof his cabinet.

Many painters own at least one - the affordable Detolf cabinet by Ikea.
For the price of it, it is hard to beat. But it has one big flaw, it is not dust proof.
While the back of the cabinet is completely closed, the door has huge gaps on the sides.
This will lead to dusty miniatures over time, something that no one likes.
In this tutorial we will show you one way to make your Detolf dust proof.
Raffa now takes over! We hope you enjoy!
Support MV!
If you like to support the monkeys of Massive Voodoo in what they do, please feel invited to drop a jungle donation in their direction via paypal or check their miniatures they got on sale.
_______________________________________________________________________
What you need for one cabinet:
EITHER
- 3,5 m (~11,5 feet) of 7mm self-adhesive brush seal
- 35cm (~1,15 feet) of 4mm self-adhesive brush seal
OR
- 4 m (~13,1 feet) of 7mm self-adhesive brush seal
AND
- Cutter or scissors
- Pencil
- 30 minutes of time
Before we start, did you check out "Pimp my Detolf" and Peters "How not to assemble a Detolf" (always check for the direction of the metal parts on the side!) ?
 This is the self-adhesive brush seal you will need, you can get those from ebay or home depot stores.
they come in different sizes, for a perfect seal I will use two different heights, 7mm and 4mm.
They come in different colors, grey is pretty neutral.
 We started applying the seal to the upper corner of the side and worked the way down to the bottom.
 Go slowly and don't remove the back of the self adhesive on a too big area.
Put the seal right on the corner of the side glass wall.

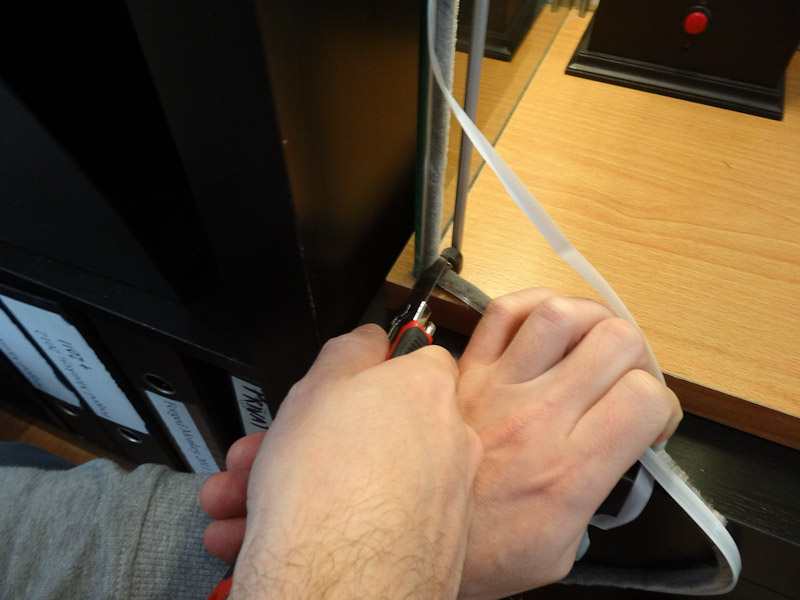
 Now, cut the end of the first piece right in the corner where the glass meets the bottom using either a scissor or a cutter ( PLEASE TAKE CARE AND DON'T CUT YOURSELF! ).
 Close the door and mark the edge of the door with a pencil.

 Also mark the edges of the metal parts on the left and right side, then apply the 4mm seal to the bottom, between the metal parts and along the line we just draw.
If you only want to use one kind of brush seal, you could also use 7mm seal slightly behind the door to seal it from the inside.
 The top part of the door is almost the same, except that there is a bigger gap.
You can use two different heights there, 4mm for the metal parts and 7mm for the glass part.


 Now, to apply the brush seal to the other side of the door, where the hinges are located, you have to remove the door. That is easily done by unscrewing the screws on the bottom hinge and then slowly take out the door. It is recommended that you have a friend helping you with this step!
Then just apply the seal like on the opposite side.
 We also recommend making your cabinet empty before working, but keeping some minis inside can help keeping your adrenaline up ;)
 Now with the door back in place, we have a dust proof Detolf, yeah!


Hope you liked this tutorial and it will helping you dust proofing your cabinet! Of course you can transfer this knowledge to your own cabinet, even it is not a "Detolf".
Raffa
this week's Tuesday Tutorial Voting brought a clear winner:
Mostly everyone wants to dust-proof his cabinet.

Many painters own at least one - the affordable Detolf cabinet by Ikea.
For the price of it, it is hard to beat. But it has one big flaw, it is not dust proof.
While the back of the cabinet is completely closed, the door has huge gaps on the sides.
This will lead to dusty miniatures over time, something that no one likes.
In this tutorial we will show you one way to make your Detolf dust proof.
Raffa now takes over! We hope you enjoy!
Support MV!
If you like to support the monkeys of Massive Voodoo in what they do, please feel invited to drop a jungle donation in their direction via paypal or check their miniatures they got on sale.
_______________________________________________________________________
What you need for one cabinet:
EITHER
- 3,5 m (~11,5 feet) of 7mm self-adhesive brush seal
- 35cm (~1,15 feet) of 4mm self-adhesive brush seal
OR
- 4 m (~13,1 feet) of 7mm self-adhesive brush seal
AND
- Cutter or scissors
- Pencil
- 30 minutes of time
Before we start, did you check out "Pimp my Detolf" and Peters "How not to assemble a Detolf" (always check for the direction of the metal parts on the side!) ?
Ok? Then let's start!

they come in different sizes, for a perfect seal I will use two different heights, 7mm and 4mm.
They come in different colors, grey is pretty neutral.


Put the seal right on the corner of the side glass wall.

Almost there...


It needs to be barely visible.

If you only want to use one kind of brush seal, you could also use 7mm seal slightly behind the door to seal it from the inside.

You can use two different heights there, 4mm for the metal parts and 7mm for the glass part.

Just like this.

Or like this.

Gives a perfect seal.

Then just apply the seal like on the opposite side.


Hope you liked this tutorial and it will helping you dust proofing your cabinet! Of course you can transfer this knowledge to your own cabinet, even it is not a "Detolf".
Raffa


Very useful. I've got a few of these cabinets and will have to put this idea to use. I might try it on my Billy cabinets as well.
That is a great Tutorial. I actually was currently thinking about an solution to avoid dust. This was very helpful!
Likey!
I feel just sick thinking I'll have to clean all stuff in my display case sometimes =/
Very helpful, thanks. There is nothing more annoying than having to clean dust off of miniatures sitting in a display.
Since there's no ikea store near me, I wanted to order two for delivery, until I saw the delivery fee was $300-some-odd dollars haha Some day soon I'll make the trip though to pick one up
Splendid idea!
i'm glad that you took pictures and sharing with us! thanks a lot!!!!!
Gerade nachgebaut! Sieht alles sehr dicht aus, nur schließt die Tür jetzt nicht mehr so richtig, da ich alles mit 7mm beklebt habe. Habe sie jetzt mit Klebeband angedrückt, damit sich alles "setzen" kann. Danke für den Tipp! LG, Erik
Where can you find it? Great post! Ive been looking everywhere. Home Depot and Lowes dont carry it. Any help would be greatly appreciated. I dont want to screw this up so if ebay, do you know which ones? I also tried Amazon but I dont think they have the right ones either. Thanks guys for your time and thanks again for the awesome post.
Thanks for the tutorial. I incorporated some of the things you showed here with my ideas. Very happy with the way it turned out. :)
Where did you get the brush seal from and exactly what were the measurements of the seal? Was the seal 7mm x 7mm, because I cannot find that online. Any help is greatly appreciated. Thanks and AWESOME idea I plan on using this coming week, as long as I can find the seal.
Can't seem to find 4 or 7mm height. Would a 5mm/9mm one work? Those are the closest i could find.
I did 5 and 9. I managed to fit them in without removing the doors or the display items
It makes me sooo angry that you dont have direct links to purchase the items....I cant find it anywhere and its really triggering
This is a fantastic tutorial , just ordered some 7mm brush seal on amazon, fingers crossed this works. 👍