


Hey Jungle People,
I didn't post a lot recently, will I explain this? I guess not :P
Let's just look forward and learn lessons from the past, maybe look back at some old-school, less serious, jungle moments of MV and remember where we come from?
Cool projects and some words about the creation.
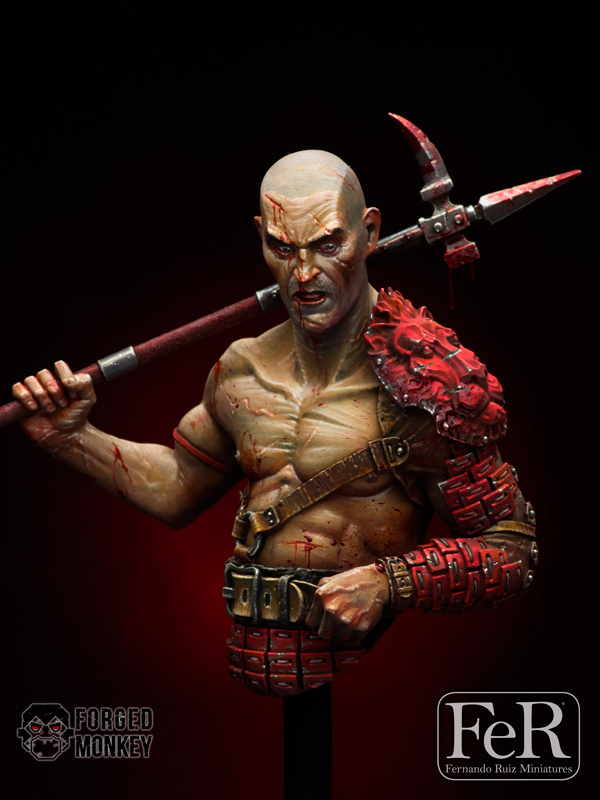
Starting today with a project I finished in 2017 for the Crystal Brush, and ... for sure, for myself!
On the Crystal Brush, it placed second in the large scale category.
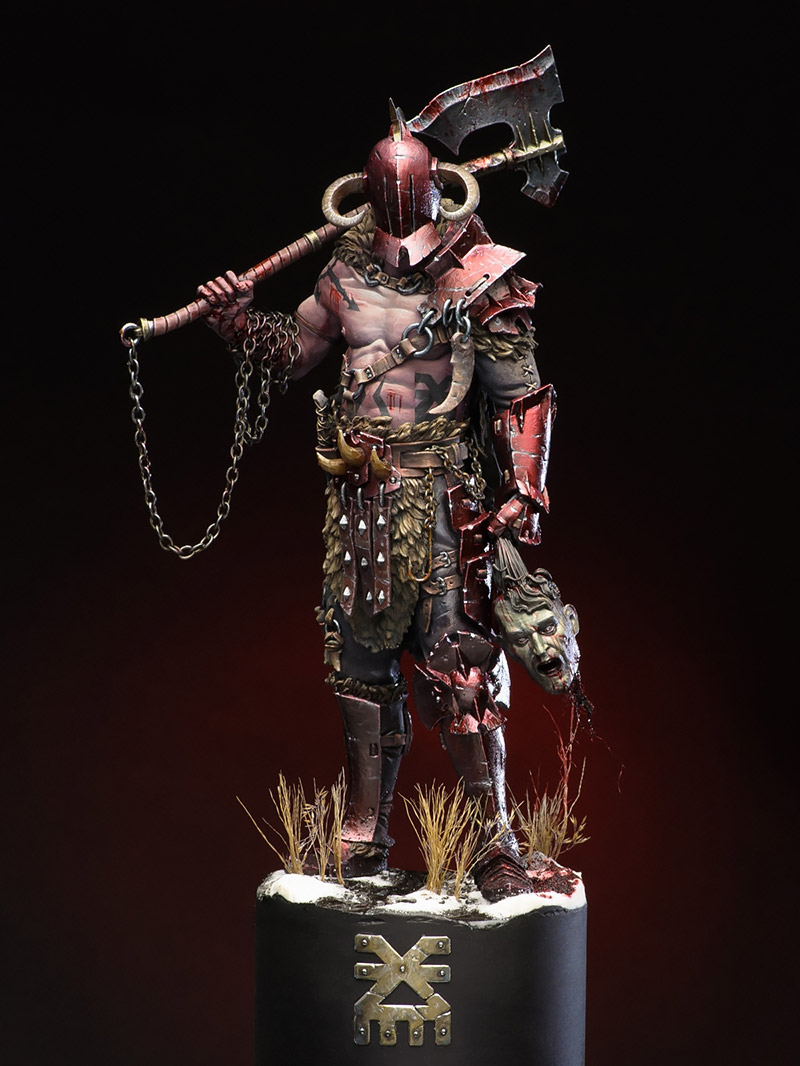
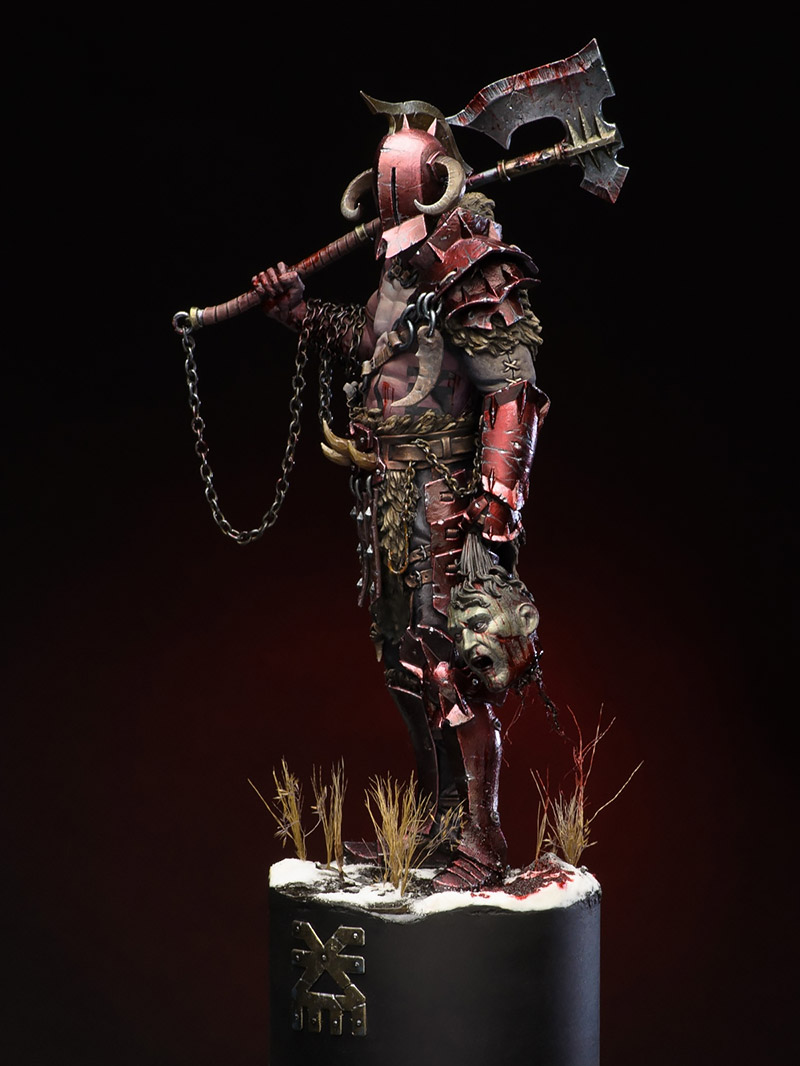
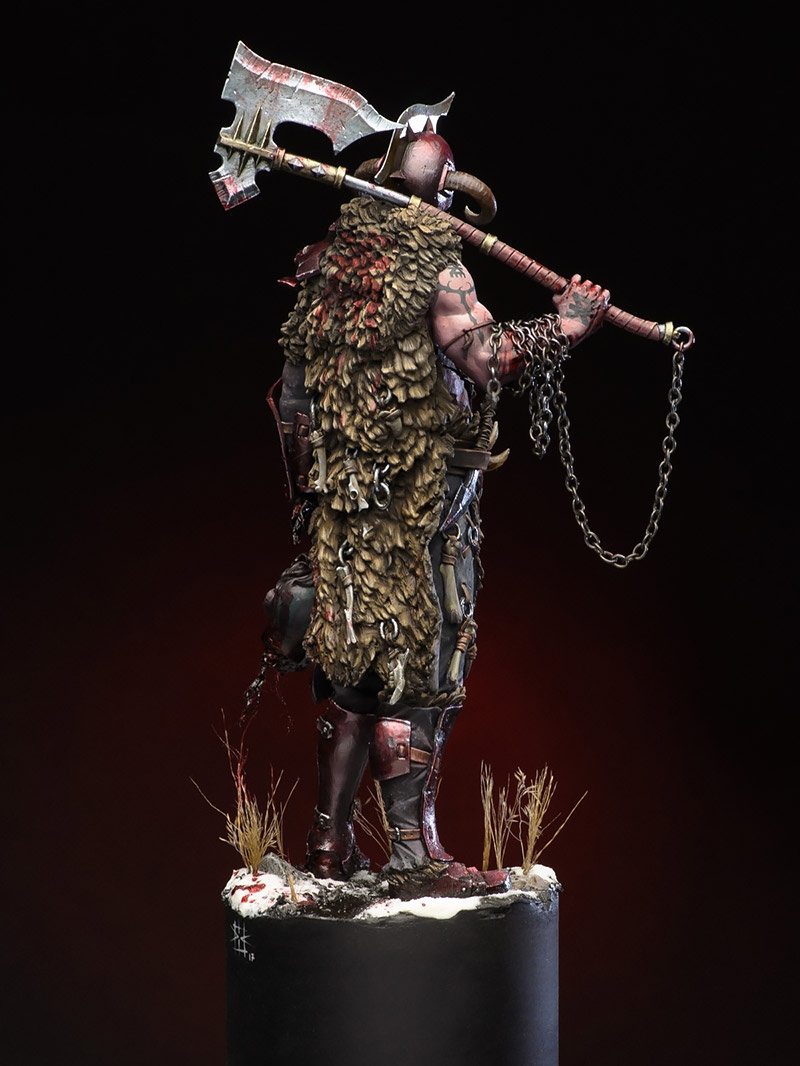
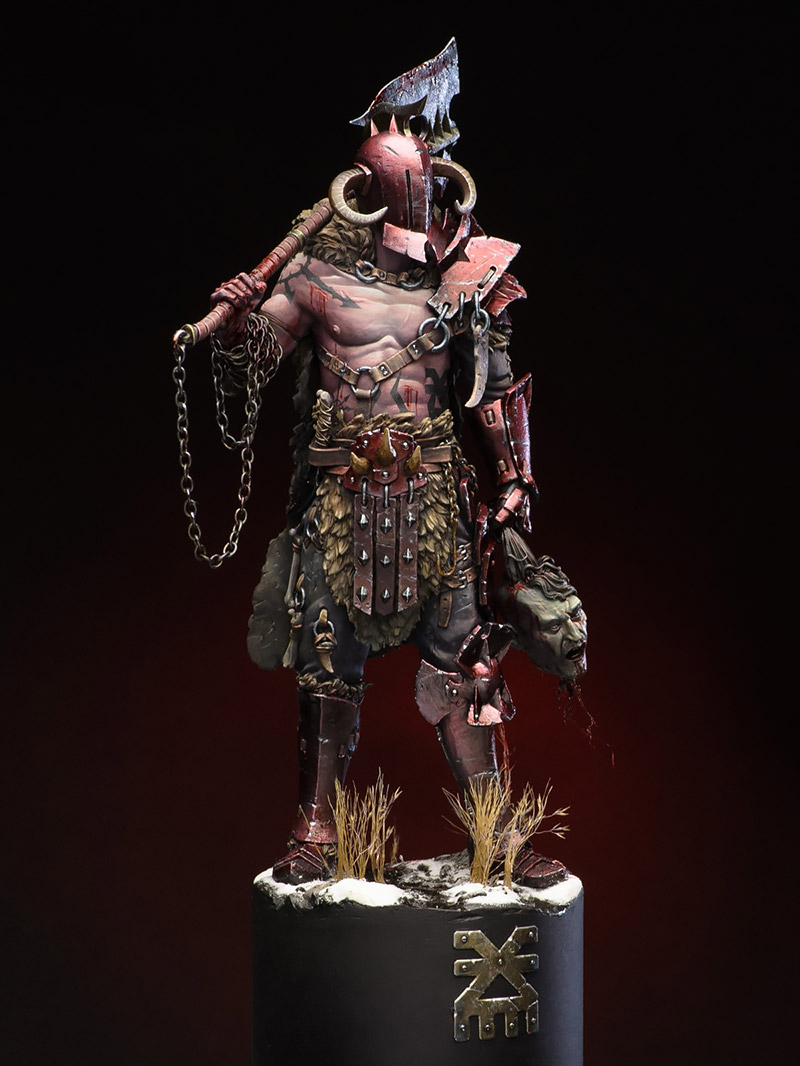
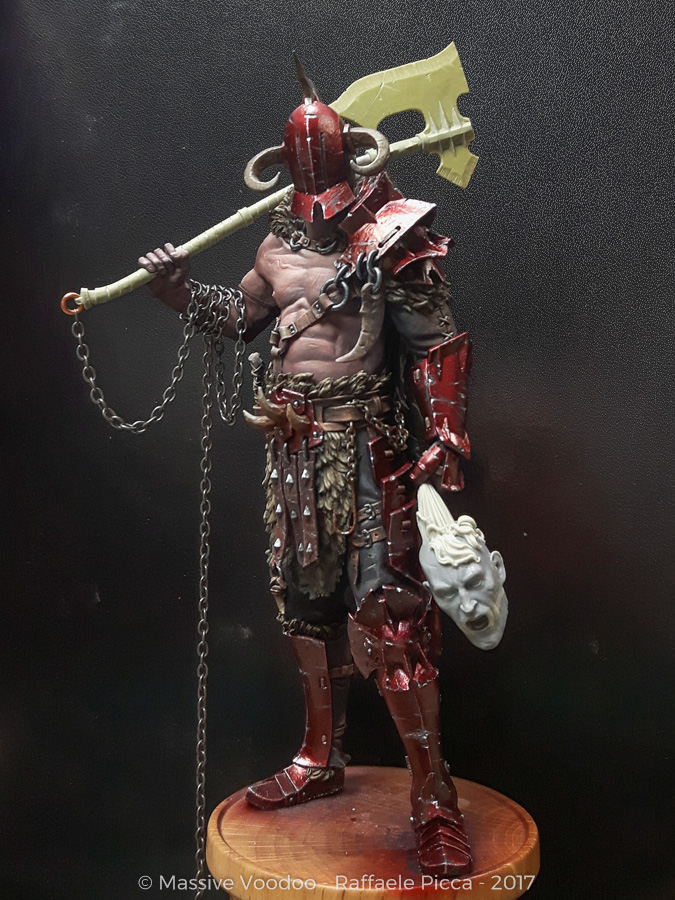
Before diving into the creation of the project, let me show you the finished piece.


I wanted to create a big scale, full sculpted project for quite a while now. With the idea of converting a bust into a full figure I started out with the Red Lion bust I sculpted a while ago - it was released at Fernando Ruiz Miniatures.

I thought about "expanding and enlarging" a bust to a full figure for quite a while and the Red Lion seemed perfect for this plan.
The first step was to build a dolly, measuring and planning how tall the final figure will be, measuring from the Red Lions body. That was a pretty annoying process, I found out quickly that some of the anatomic measurements of the bust were a bit off and that it made the final full figure look very strange.
I had to rearrange some elements to make it work and after a while, I had this mock-up.

I wasn't perfectly happy, but the basic idea was sketched out.
One part that took quite some was to make the resin part of the body removable. As the rest of the figure was sculpted with oven-baked clay - BeeS Putty Plastic Summer Xtra - I had to be able to remove the resin before baking.
Afterwards, I have to say, I think sculpting the figure as a whole new sculpt would have eventually saved me some time.

Another shot of the sculpting process. You can see the arm was moved to a new position and converted with a mix of Green Stuff and Magic Sculp - because I could not bake it ;)

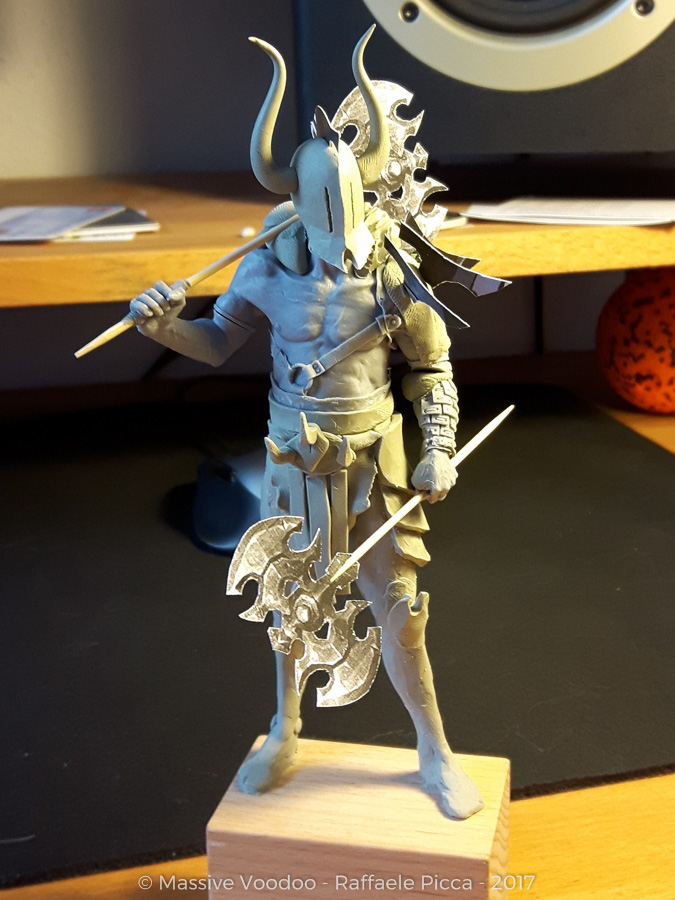
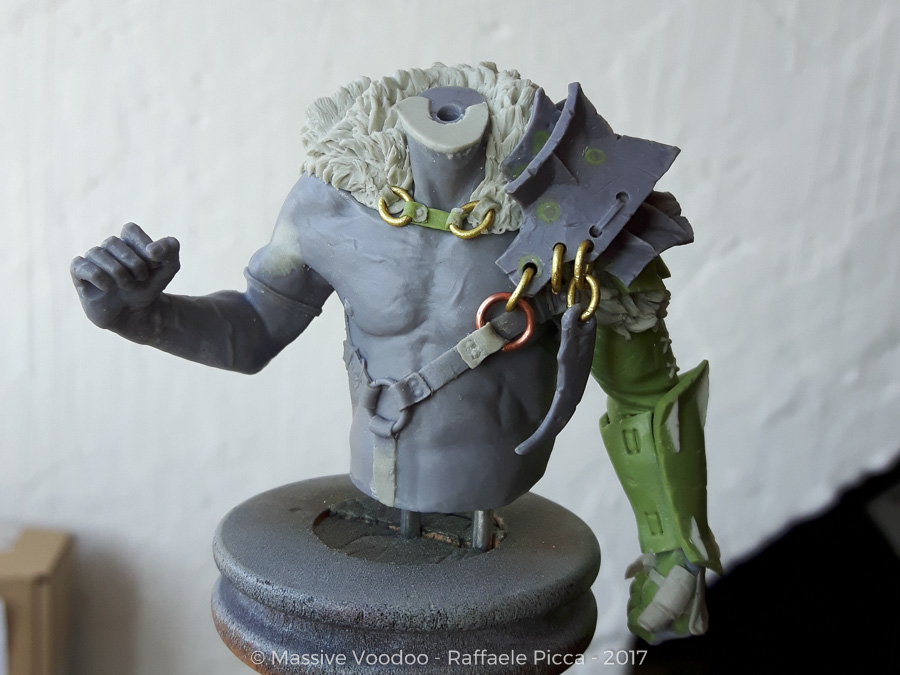
A bit further in the process, slowly it's more and more complete. As you can see I deviated a bit from the first mock up. One axe is enough, even for a Son of Khorne :D
In his hand, he has the head of a fool.
On this photo, it is also very visible how many different materials were used.
Bees Putty, Green Stuff, Magic Sculpt, brass wire (shaped to rings using a round object), silver wire, brass chain, an old fishing hook I found at the beach, some resin parts of different other busts (shoulder is from Sha'un as are the horns, the head is from the original Red Lion bust), Brita water filter balls, copper wire, mouse bones.

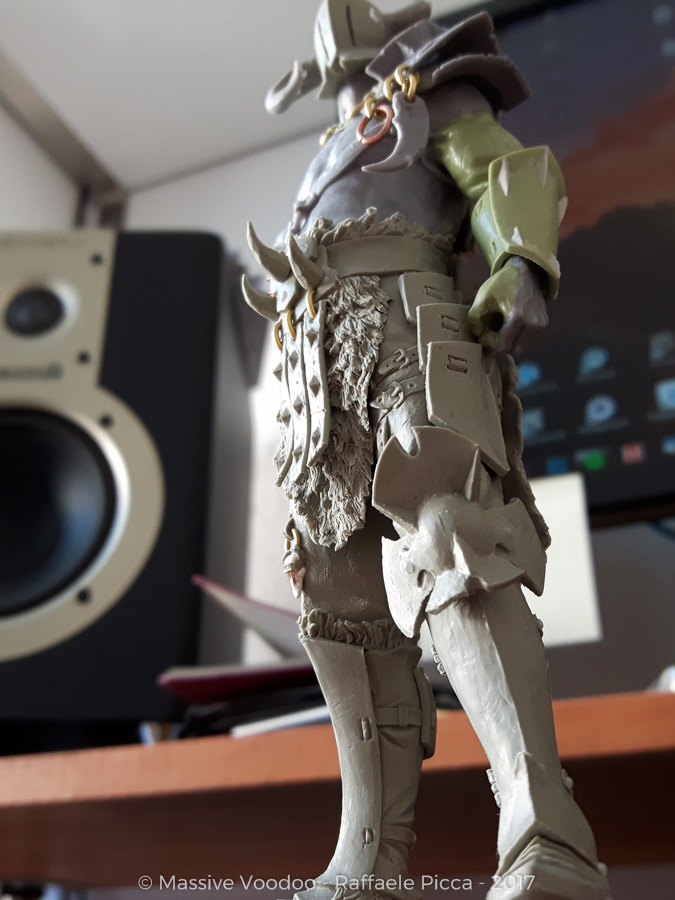
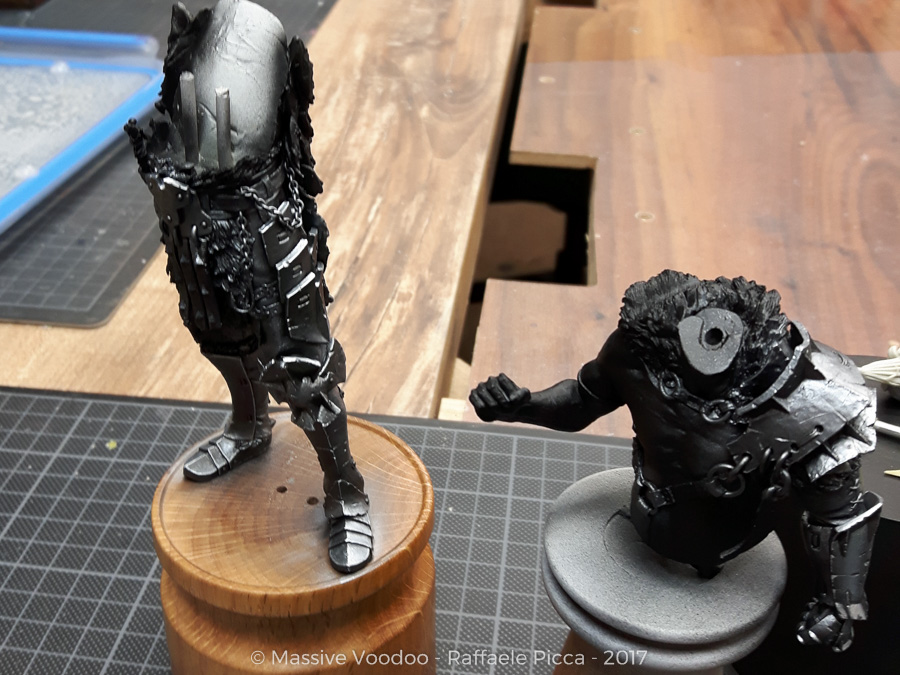
On this photo, the lower body is baked and finished. You can see the two big brass rods coming out of the lower body. It's the dolly of the legs also working to separate the bakeable lower body from the upper body containing resin parts. It also made the painting part a lot easier on such a big figure (around 18cm overall height)

And the upper body, mostly resin parts mixed with Green Stuff and Magic Sculp

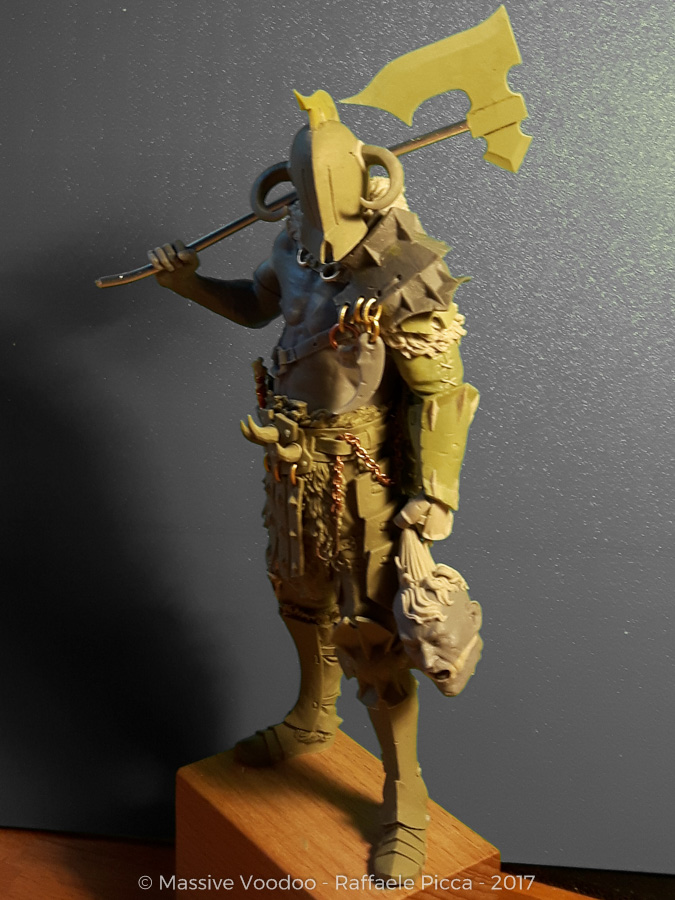
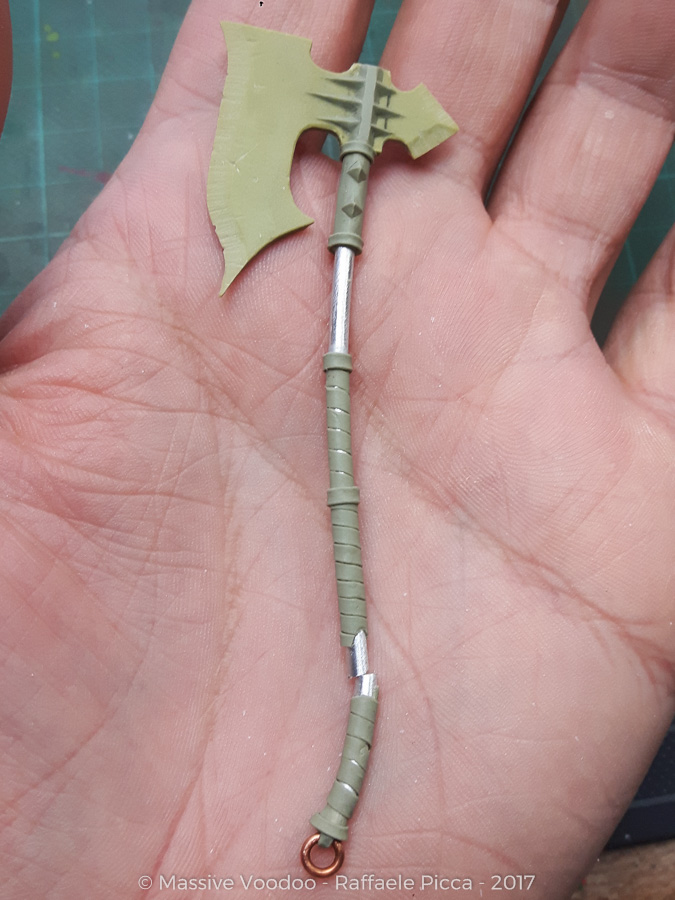
The axe also got the finishing touches. The axe blade was made from a Green Stuff/Magic Sculp mix.
This gives a really hard material that can be cut, sanded while still being flexible. Perfect for weapons and thin blades.
The handle is an aluminum rod with Bees Putty sculpted leather wrapping and connection to the blade.

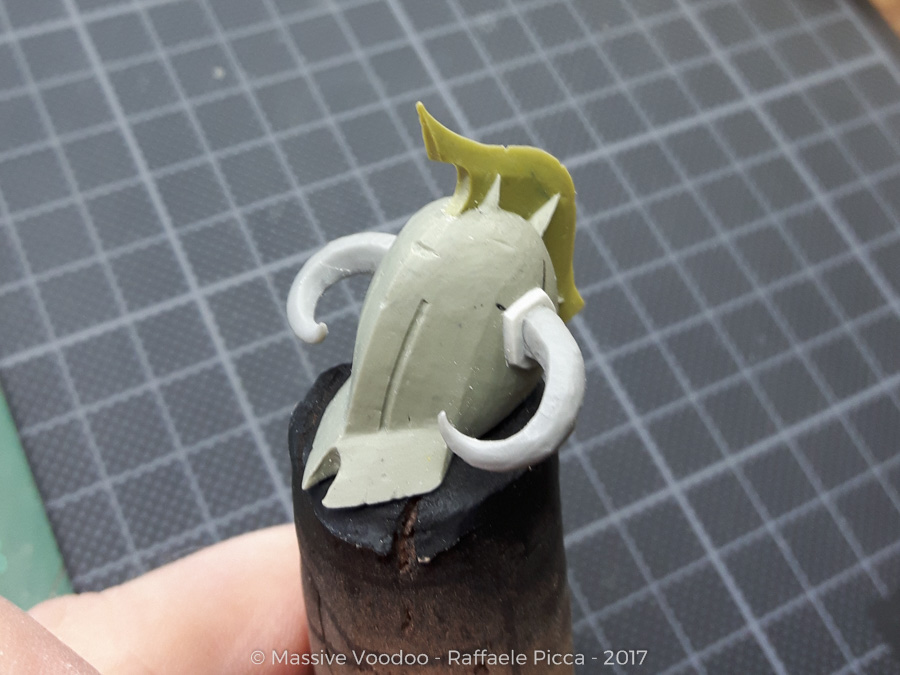
The same principles were applied to the helmet. The basic shape was sculpted with Bees Putty, the blade on top of the helmet was done with the GS/MS mixture and the resin horns were added after baking the main parts and connected with Magic Sculp.

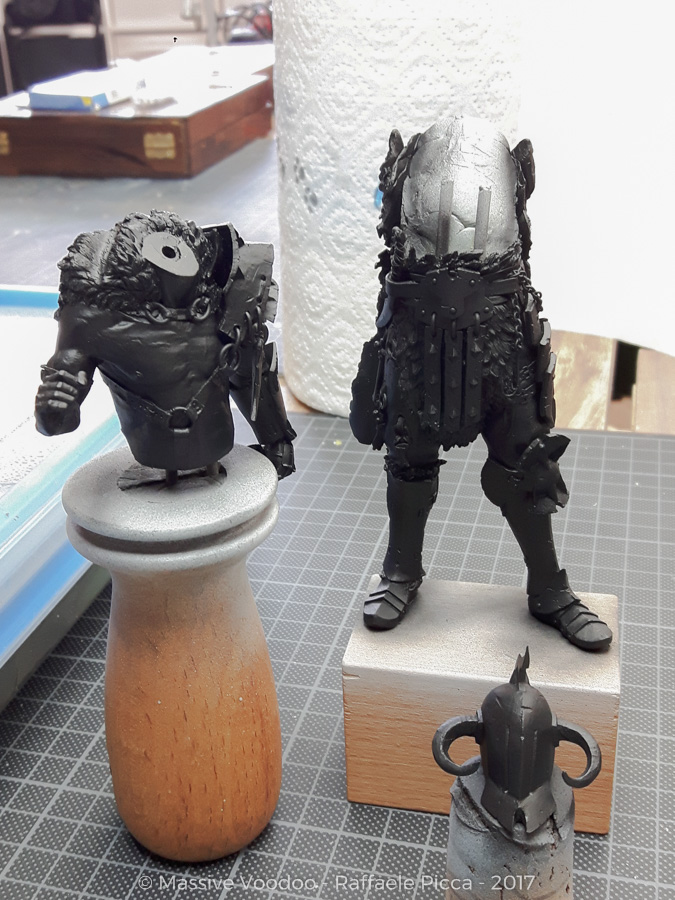
After all the parts were finished and prepared, everything was base coated black with Games Workshop spray and some touch ups were done using Vallejo Primer and my trusty Harder & Steenbeck Evolution 2in1 with a 0.4mm nozzle.

Next step was to apply a quick spray of "Black Metal" by Scalecolor.
Highlights were painted and sprayed with the brush and my Harder & Steenbeck Infinity airbrush using a 0,2mm nozzle. For the highlights, I used "Heavy Metal" by Scalecolor.
Shadows were painted and sprayed using "Neutral Grey" by Schmincke airbrush paints.

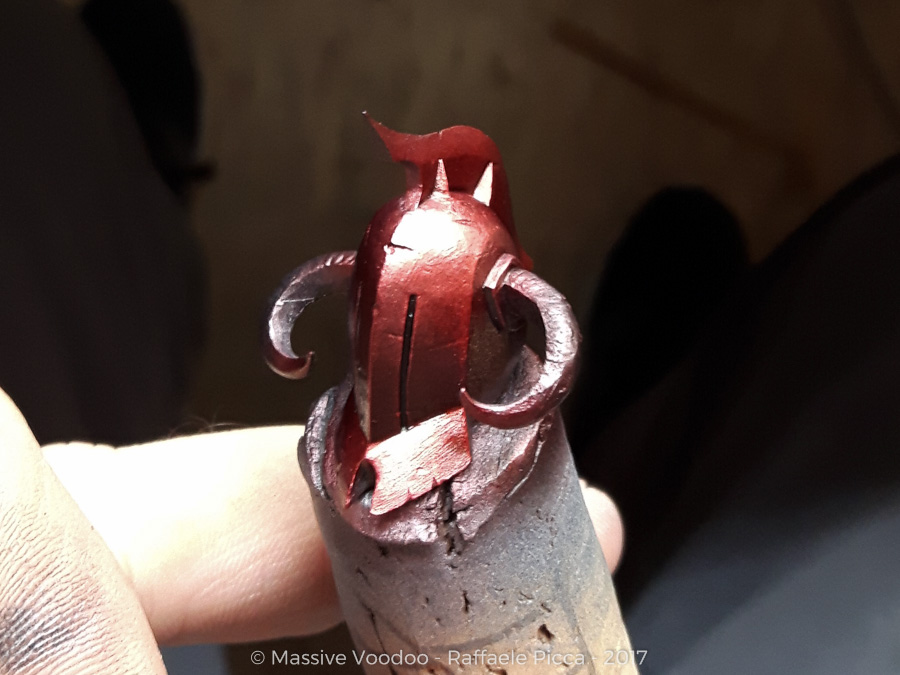
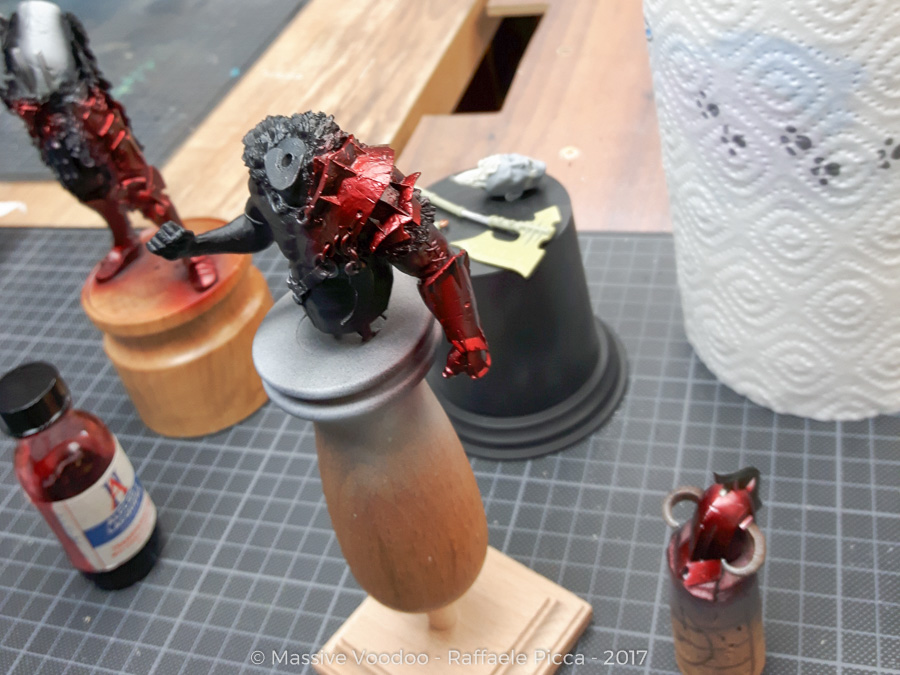
The next step took a lot of courage to pull off. I painted a transparent red over all of the metallic parts to give them a red metallic look. I was really unsure if it will look good. But having a very dull, desaturated, cold figure and "normal" metallics would have looked too boring in my opinion.

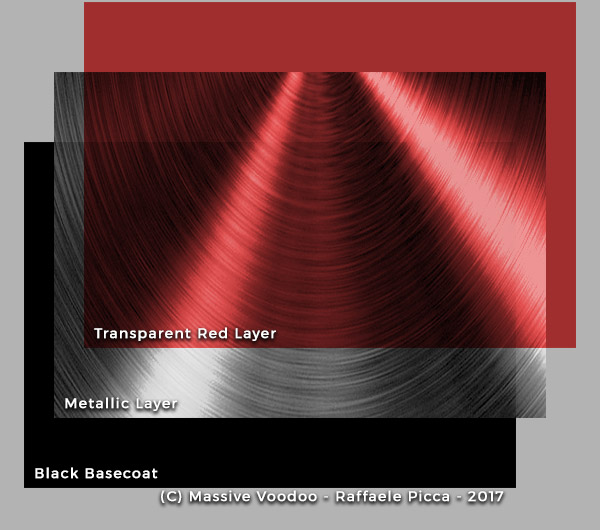
The effect works like on this diagram. The black base coat acts as a backdrop for the, often transparent, metallic paint. After highlights and shadows are painted on the metal, transparent red paint is applied evenly over the metallic paint. Most transparent paints work, I have used "Transparent Red" by Alclad II. Other options would be Crystal Red by MIG, Clear Red by Tamiya or maybe even Blood for the Blood God by GW.

As the transparent red paint always takes away some of the contrast I worked on bringing back those highlights and shadows. I also started painted all the other parts of the helmet.

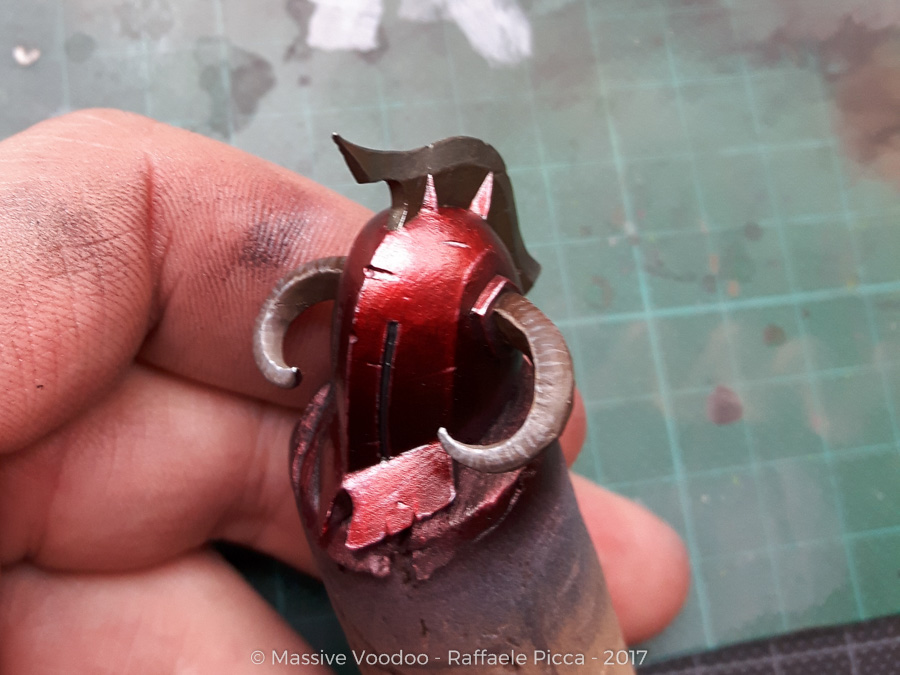
You can see the new highlights that were painted using Speed Metal by Scalecolor.

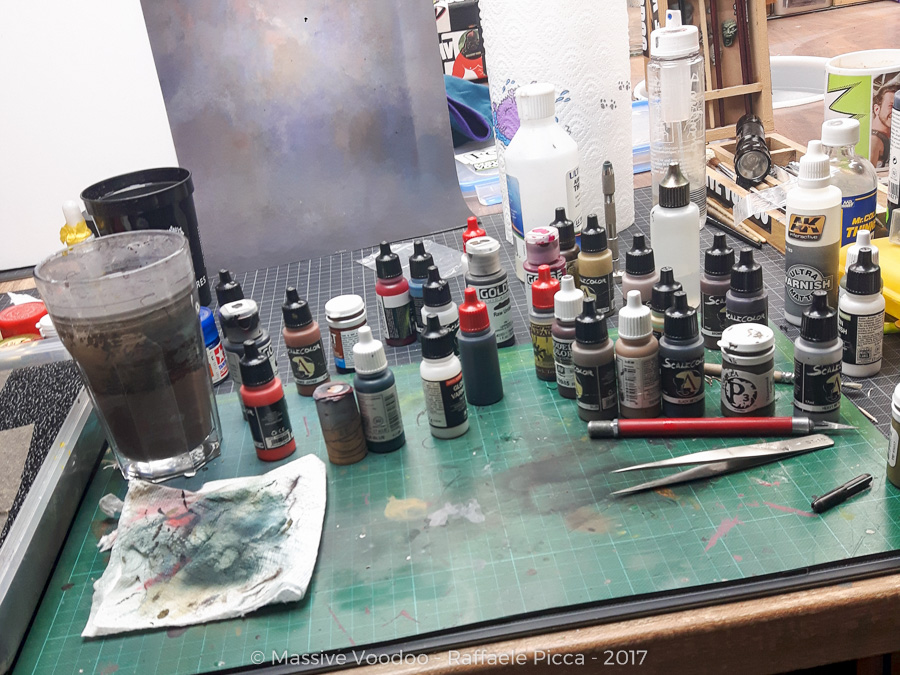
That's how my workplace looked at that point. Still kind of clean and organized. That changed when the projects continued.

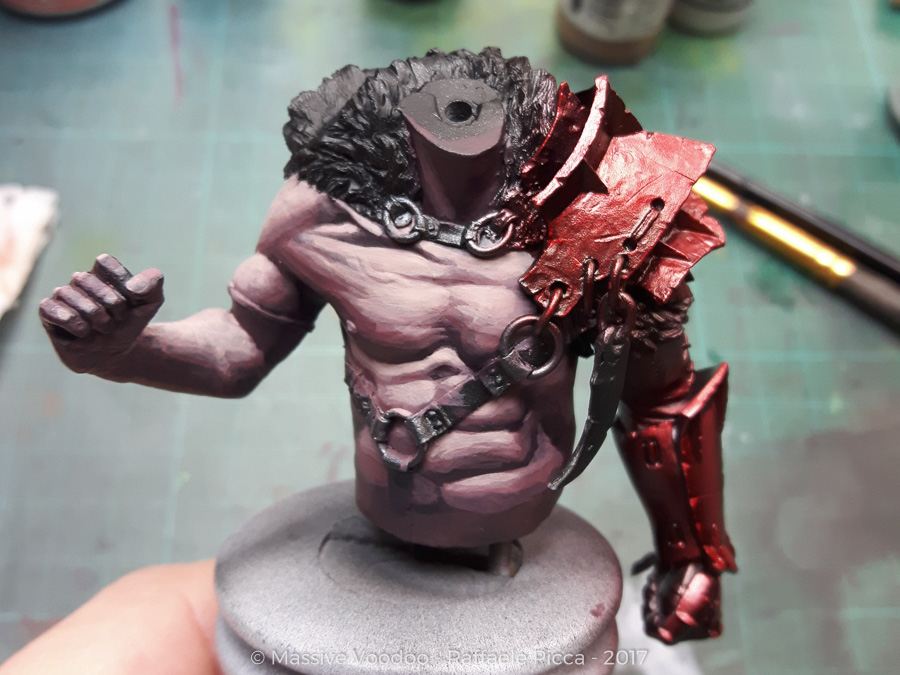
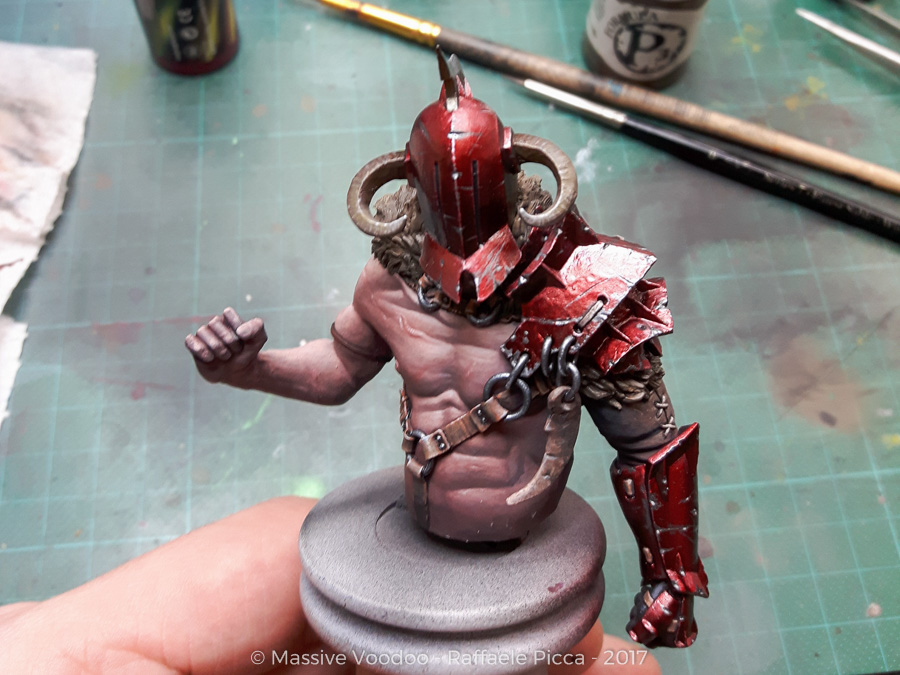
Red was applied to all armor parts, not all received the highlights and shadows as you can, for example, see very well on the arm armor part.

At that point, I also wanted to continue to other parts of the figure and not stick to the red metals for too long. It can help the eye a lot to understand the complete situation if you start applying color to other elements of the figure.
Here I started to paint the skin. You can see that I used a technique that looks a bit odd at first. I often use this technique when I don't have a lot of time and want to get quick results.
I have a very clear vision of highlights and shadows, so it is no problem to paint the areas very defined and smooth it out later. I would not call this a sketch as I had my goal clearly in mind and it is not a "concept" but just a step in the process.
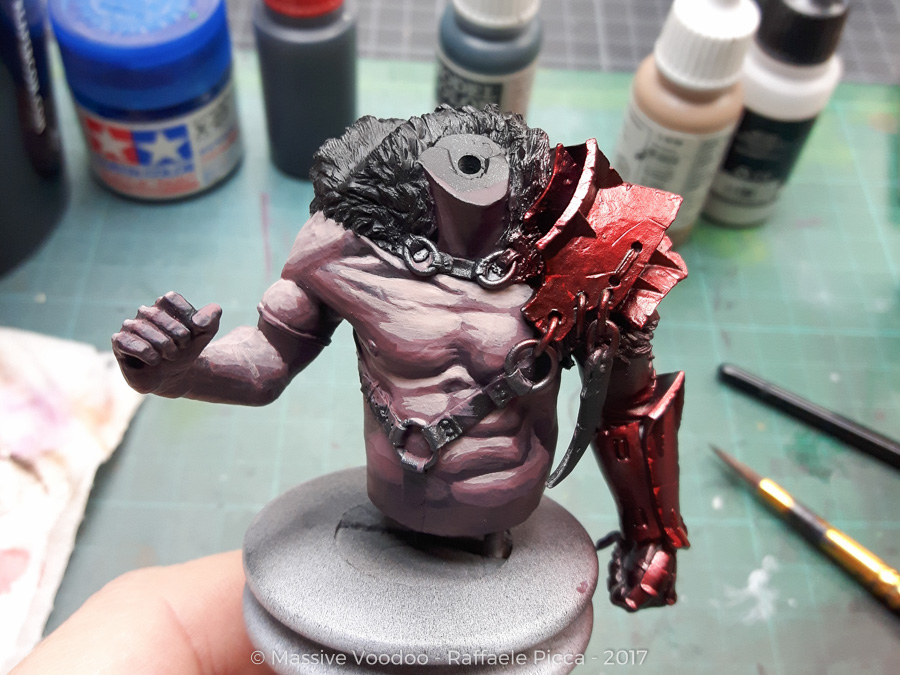
I can't remember the paints I used as I write this a lot later. But from the photo, I guess it is Black Leather by Scalecolor and Sandalwood by Scalecolor mixed with something else ;)
You can also notice a little streak of highlights on the top of the chest.

This highlight step is continued on the rest of the skin. I also used one more step to smooth out the gradient between the layers.

More smoothing, just applying more steps and layers of blending tones.

The final step was smoothing it out using the airbrush. If you want to learn this, you have to visit a class or private coaching. It's a wee-bit hard to explain it just with words and photos ;)
At this point, I spent around 45 minutes on the skin parts.

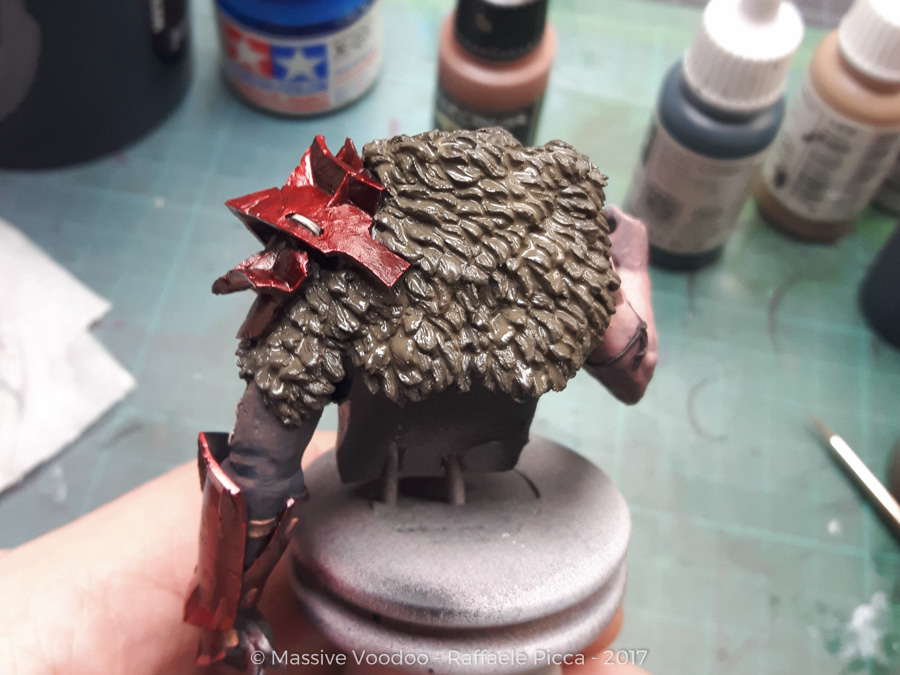
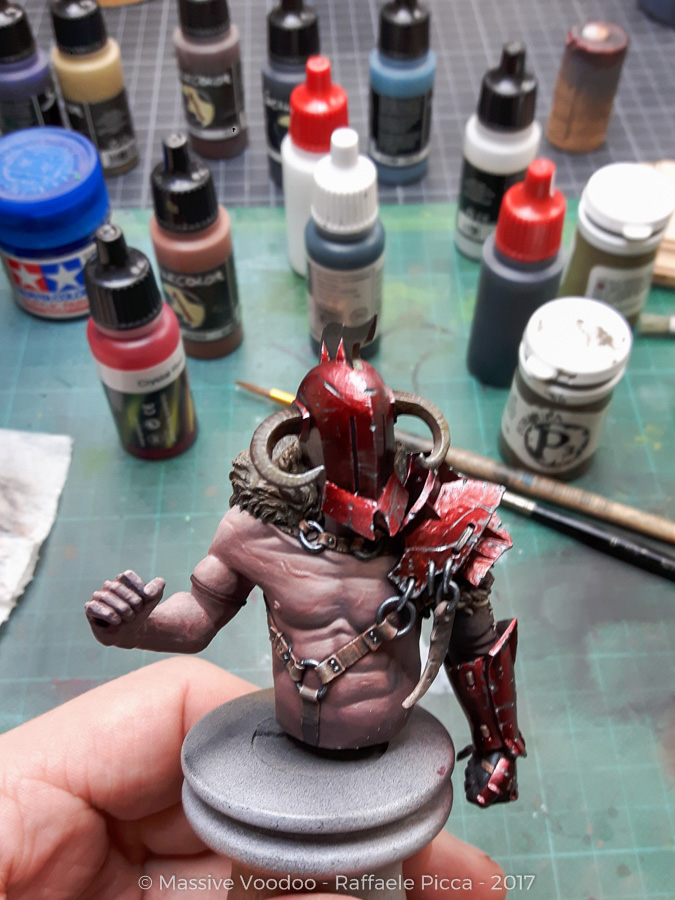
I started sketching on the fur and also painted some other, non-metallic parts of the figure, like the leather sleeve and straps. On the fur, I used a wet-in-wet technique to quickly give the fur some highlights and shadows to create some depth and volume.

Some more progress on the skin by bringing in some more color variations. The leather straps also got some paint, slowly everything is getting tied together.
For the leather I used more paints by Scalecolor that I can't remember. But basically, it's just a lot of brown variations. I mixed what I felt would fit nicely into the surroundings ;)

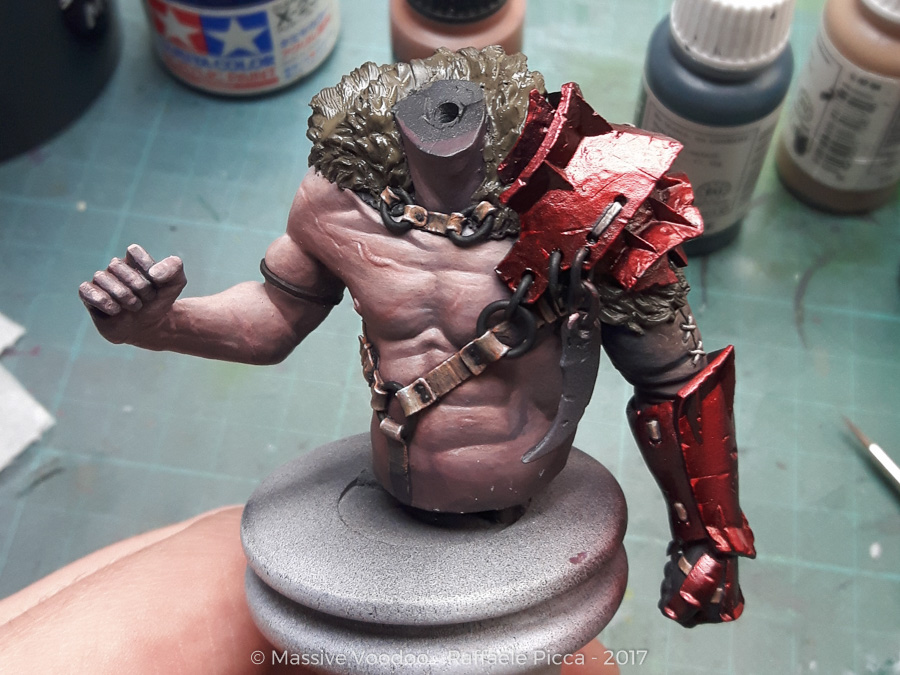
A little test fits with the head. You can also see that the remaining metal parts were painted with a combination of Black/Heavy/Speed Metal by Scalecolor. The hanging horn also got more saturation and contrast.
At that point, I also had the feeling that the red metallic parts still look a bit flat and boring.
After thinking about possible solutions, I tried to add scratches and damaged parts by using Heavy Metal by Scalecolor. You can see the scratches, chips and dents on the helmet, shoulder and arm armor parts.

Just a different angle :)

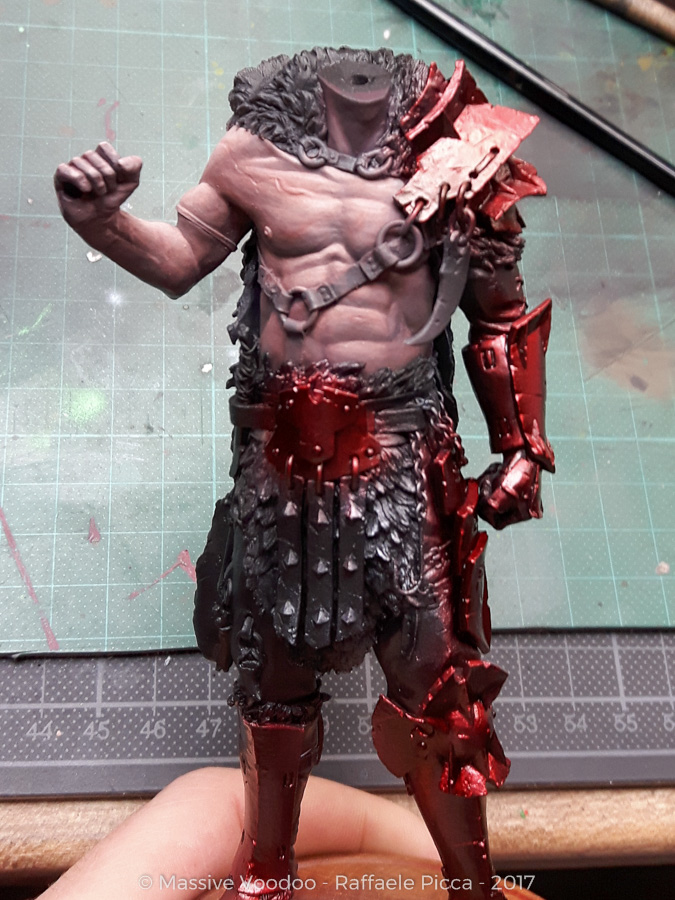
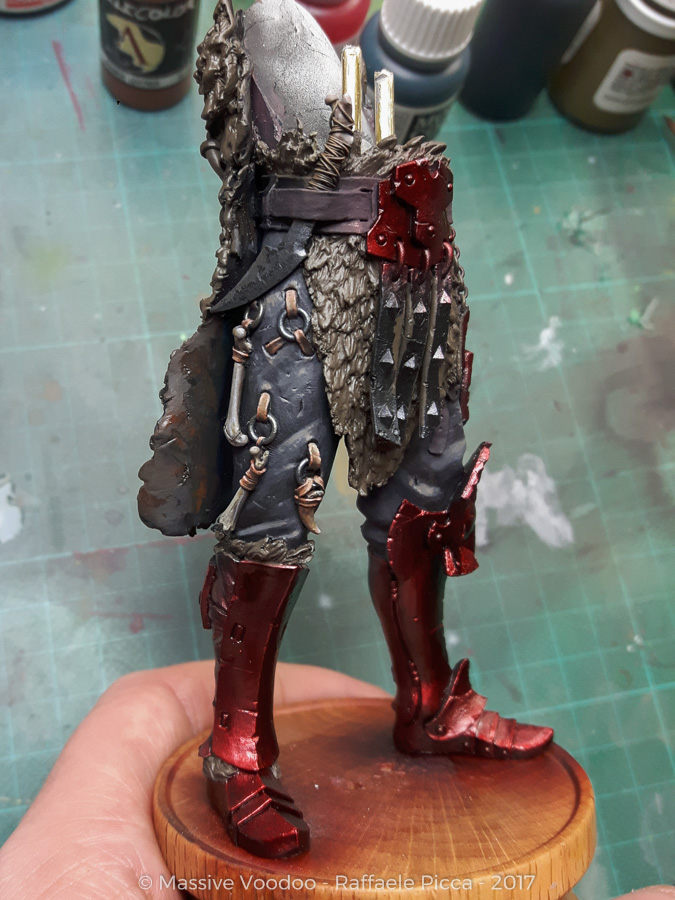
The lower parts of the figure screamed for attention, so I started to paint the pants, leather straps, metal rings, fur parts and bones.

The hanging leather straps were painted in a dull, red leather look. I tried to make the edges look like they have seen a lot of fighting and gave them a weared look. More leather parts were painted and more contrast was added to the fur parts.

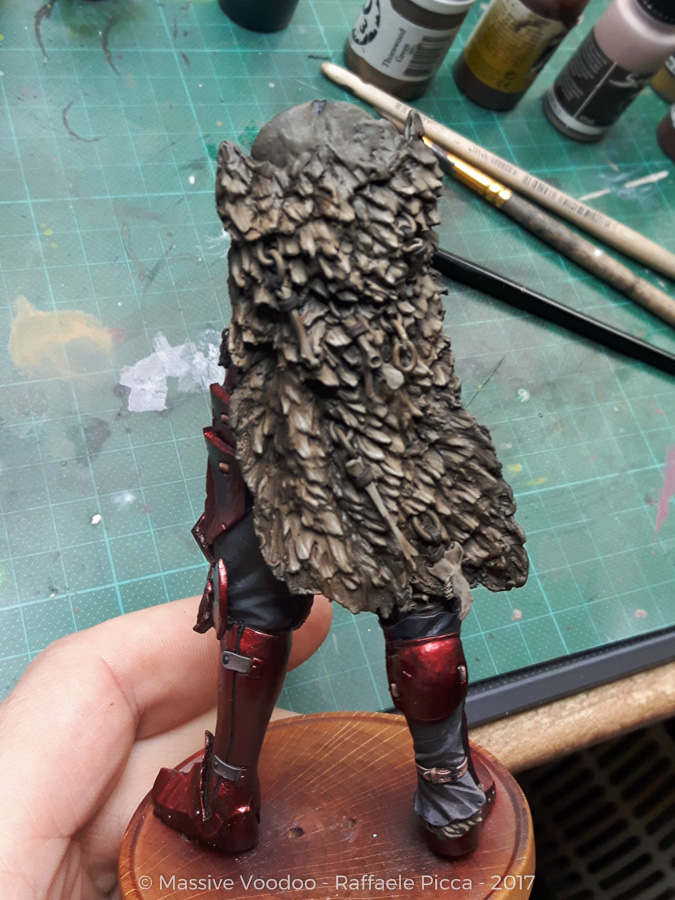
More contrast and depth was added to the big fur cloak on the back.

At that point, time was running through my fingers like water.
In the hurry, I took a lot fewer photos, but I can still say a thing or two about the process.
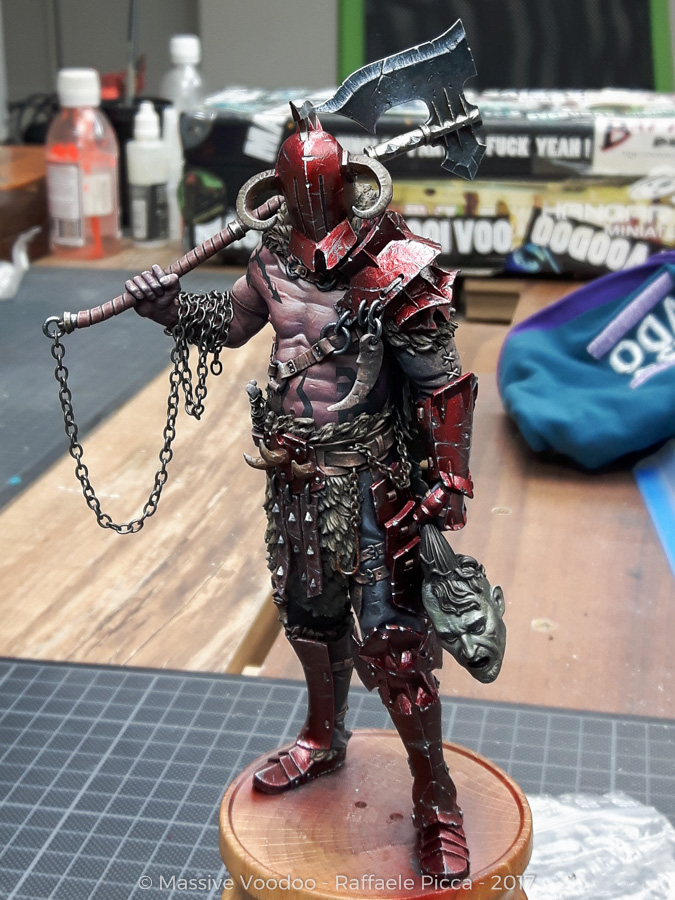
Uniting all the parts was the biggest joy at that point. To get a feeling for the final overall look was amazing.
Apart from that, the most obvious change here is the chain. It's just a small brass chain that you can buy for ship scale modeling. I thought quite a while about what was the best way to paint the chain.
Just painting it with black metal would have been an option, but then I needed to fixate the chain first. Anyone who ever tried to fixate such a long chain in place knows that using super glue works quite well, but on such a long chain it would definitely lead to problems and also take away some of the details. If you just paint a chain without fixating it, the paint would rub away from the metal-on-metal movement over time. So that was no option either.
After grinding my gears for a while I realized I could just blacken the chain using a liquid that is usually used for brass etched parts. I sanded the chain a bit to fasten the time it would take to make the brass chain black, but in the end, it worked out perfectly and leave me with a nice, black chain :)
Sometimes the smallest detail can be a challenge in such a huge project.

I decided to add some tattoos to his arm and chest. I just wanted to break up the big surface with some interesting shapes. You also notice the axe is finally painted.

Slowly, everything is coming to and end. The head was painted and glued in place. All that is missing are the final blood effects and the base.
Unfortunately I was in such a tight timeline, using up the last hours before my flight to build and paint the base, that I did not take any photos.
 My painting table at the end of the project. A bit messier then in the beginning, but still looking ok compared to other projects in the past.
I really hope you enjoyed this little project log. I didn't call it a step by step as there are a couple of steps missing, especially the base and painting the different elements in detail.
But I hope you still got some inspiration for your next project out of this!
By the way, this project is for sale. So if you want to add a truly unique and one of a kind project to your collection, check out my Art Catalogue.
_______________________________________________________________________________
You want to support Massive Voodoo?
If you like to support or say thanks the monkeys of Massive Voodoo in what they do, please feel invited to drop a jungle donation in their direction via paypal or check their miniatures they got on sale here.
_______________________________________________________________________________
I didn't post a lot recently, will I explain this? I guess not :P
Let's just look forward and learn lessons from the past, maybe look back at some old-school, less serious, jungle moments of MV and remember where we come from?
Cool projects and some words about the creation.
Starting today with a project I finished in 2017 for the Crystal Brush, and ... for sure, for myself!
On the Crystal Brush, it placed second in the large scale category.
Before diving into the creation of the project, let me show you the finished piece.
Photos
Project Log
I wanted to create a big scale, full sculpted project for quite a while now. With the idea of converting a bust into a full figure I started out with the Red Lion bust I sculpted a while ago - it was released at Fernando Ruiz Miniatures.
I thought about "expanding and enlarging" a bust to a full figure for quite a while and the Red Lion seemed perfect for this plan.
The first step was to build a dolly, measuring and planning how tall the final figure will be, measuring from the Red Lions body. That was a pretty annoying process, I found out quickly that some of the anatomic measurements of the bust were a bit off and that it made the final full figure look very strange.
I had to rearrange some elements to make it work and after a while, I had this mock-up.
I wasn't perfectly happy, but the basic idea was sketched out.
One part that took quite some was to make the resin part of the body removable. As the rest of the figure was sculpted with oven-baked clay - BeeS Putty Plastic Summer Xtra - I had to be able to remove the resin before baking.
Afterwards, I have to say, I think sculpting the figure as a whole new sculpt would have eventually saved me some time.
Another shot of the sculpting process. You can see the arm was moved to a new position and converted with a mix of Green Stuff and Magic Sculp - because I could not bake it ;)
A bit further in the process, slowly it's more and more complete. As you can see I deviated a bit from the first mock up. One axe is enough, even for a Son of Khorne :D
In his hand, he has the head of a fool.
On this photo, it is also very visible how many different materials were used.
Bees Putty, Green Stuff, Magic Sculpt, brass wire (shaped to rings using a round object), silver wire, brass chain, an old fishing hook I found at the beach, some resin parts of different other busts (shoulder is from Sha'un as are the horns, the head is from the original Red Lion bust), Brita water filter balls, copper wire, mouse bones.

On this photo, the lower body is baked and finished. You can see the two big brass rods coming out of the lower body. It's the dolly of the legs also working to separate the bakeable lower body from the upper body containing resin parts. It also made the painting part a lot easier on such a big figure (around 18cm overall height)
And the upper body, mostly resin parts mixed with Green Stuff and Magic Sculp
The axe also got the finishing touches. The axe blade was made from a Green Stuff/Magic Sculp mix.
This gives a really hard material that can be cut, sanded while still being flexible. Perfect for weapons and thin blades.
The handle is an aluminum rod with Bees Putty sculpted leather wrapping and connection to the blade.
The same principles were applied to the helmet. The basic shape was sculpted with Bees Putty, the blade on top of the helmet was done with the GS/MS mixture and the resin horns were added after baking the main parts and connected with Magic Sculp.
After all the parts were finished and prepared, everything was base coated black with Games Workshop spray and some touch ups were done using Vallejo Primer and my trusty Harder & Steenbeck Evolution 2in1 with a 0.4mm nozzle.
Next step was to apply a quick spray of "Black Metal" by Scalecolor.
Highlights were painted and sprayed with the brush and my Harder & Steenbeck Infinity airbrush using a 0,2mm nozzle. For the highlights, I used "Heavy Metal" by Scalecolor.
Shadows were painted and sprayed using "Neutral Grey" by Schmincke airbrush paints.
The next step took a lot of courage to pull off. I painted a transparent red over all of the metallic parts to give them a red metallic look. I was really unsure if it will look good. But having a very dull, desaturated, cold figure and "normal" metallics would have looked too boring in my opinion.
The effect works like on this diagram. The black base coat acts as a backdrop for the, often transparent, metallic paint. After highlights and shadows are painted on the metal, transparent red paint is applied evenly over the metallic paint. Most transparent paints work, I have used "Transparent Red" by Alclad II. Other options would be Crystal Red by MIG, Clear Red by Tamiya or maybe even Blood for the Blood God by GW.
As the transparent red paint always takes away some of the contrast I worked on bringing back those highlights and shadows. I also started painted all the other parts of the helmet.

You can see the new highlights that were painted using Speed Metal by Scalecolor.
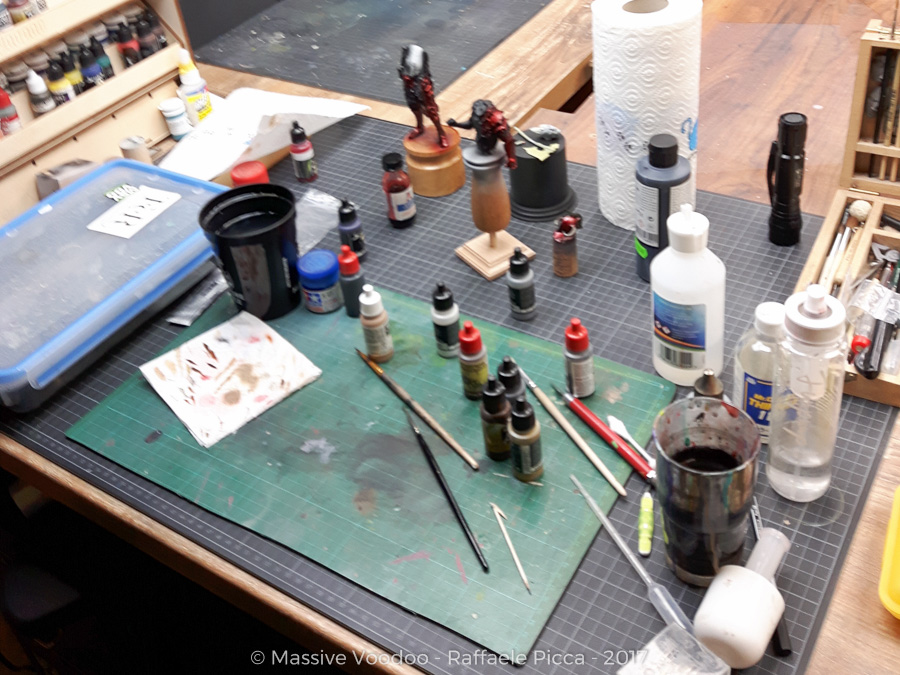
That's how my workplace looked at that point. Still kind of clean and organized. That changed when the projects continued.
Red was applied to all armor parts, not all received the highlights and shadows as you can, for example, see very well on the arm armor part.
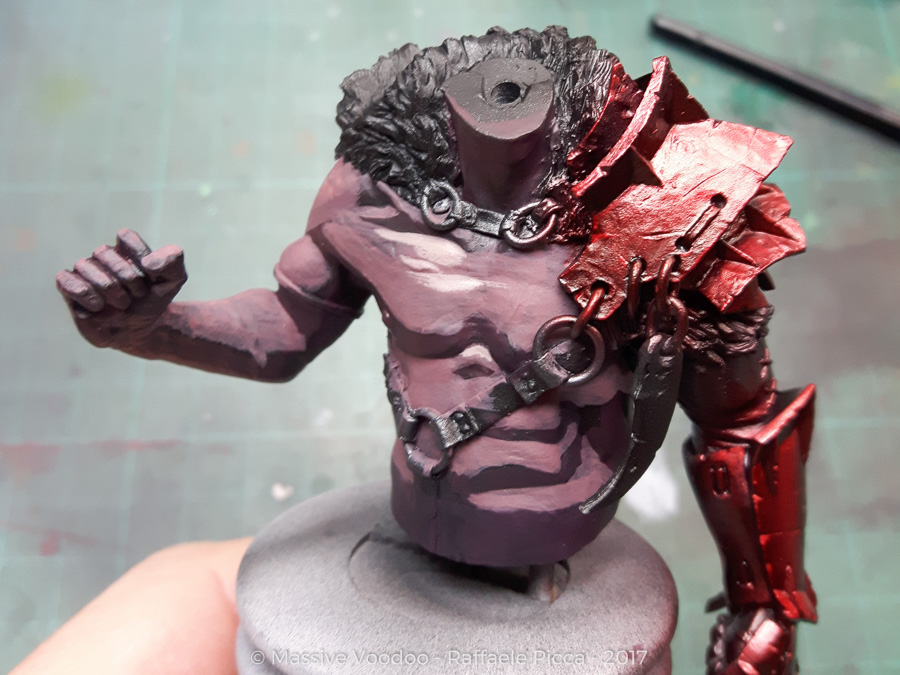
At that point, I also wanted to continue to other parts of the figure and not stick to the red metals for too long. It can help the eye a lot to understand the complete situation if you start applying color to other elements of the figure.
Here I started to paint the skin. You can see that I used a technique that looks a bit odd at first. I often use this technique when I don't have a lot of time and want to get quick results.
I have a very clear vision of highlights and shadows, so it is no problem to paint the areas very defined and smooth it out later. I would not call this a sketch as I had my goal clearly in mind and it is not a "concept" but just a step in the process.
I can't remember the paints I used as I write this a lot later. But from the photo, I guess it is Black Leather by Scalecolor and Sandalwood by Scalecolor mixed with something else ;)
You can also notice a little streak of highlights on the top of the chest.
This highlight step is continued on the rest of the skin. I also used one more step to smooth out the gradient between the layers.
More smoothing, just applying more steps and layers of blending tones.
The final step was smoothing it out using the airbrush. If you want to learn this, you have to visit a class or private coaching. It's a wee-bit hard to explain it just with words and photos ;)
At this point, I spent around 45 minutes on the skin parts.
I started sketching on the fur and also painted some other, non-metallic parts of the figure, like the leather sleeve and straps. On the fur, I used a wet-in-wet technique to quickly give the fur some highlights and shadows to create some depth and volume.
Some more progress on the skin by bringing in some more color variations. The leather straps also got some paint, slowly everything is getting tied together.
For the leather I used more paints by Scalecolor that I can't remember. But basically, it's just a lot of brown variations. I mixed what I felt would fit nicely into the surroundings ;)
A little test fits with the head. You can also see that the remaining metal parts were painted with a combination of Black/Heavy/Speed Metal by Scalecolor. The hanging horn also got more saturation and contrast.
At that point, I also had the feeling that the red metallic parts still look a bit flat and boring.
After thinking about possible solutions, I tried to add scratches and damaged parts by using Heavy Metal by Scalecolor. You can see the scratches, chips and dents on the helmet, shoulder and arm armor parts.
Just a different angle :)
The lower parts of the figure screamed for attention, so I started to paint the pants, leather straps, metal rings, fur parts and bones.

The hanging leather straps were painted in a dull, red leather look. I tried to make the edges look like they have seen a lot of fighting and gave them a weared look. More leather parts were painted and more contrast was added to the fur parts.
More contrast and depth was added to the big fur cloak on the back.
At that point, time was running through my fingers like water.
In the hurry, I took a lot fewer photos, but I can still say a thing or two about the process.
Uniting all the parts was the biggest joy at that point. To get a feeling for the final overall look was amazing.
Apart from that, the most obvious change here is the chain. It's just a small brass chain that you can buy for ship scale modeling. I thought quite a while about what was the best way to paint the chain.
Just painting it with black metal would have been an option, but then I needed to fixate the chain first. Anyone who ever tried to fixate such a long chain in place knows that using super glue works quite well, but on such a long chain it would definitely lead to problems and also take away some of the details. If you just paint a chain without fixating it, the paint would rub away from the metal-on-metal movement over time. So that was no option either.
After grinding my gears for a while I realized I could just blacken the chain using a liquid that is usually used for brass etched parts. I sanded the chain a bit to fasten the time it would take to make the brass chain black, but in the end, it worked out perfectly and leave me with a nice, black chain :)
Sometimes the smallest detail can be a challenge in such a huge project.
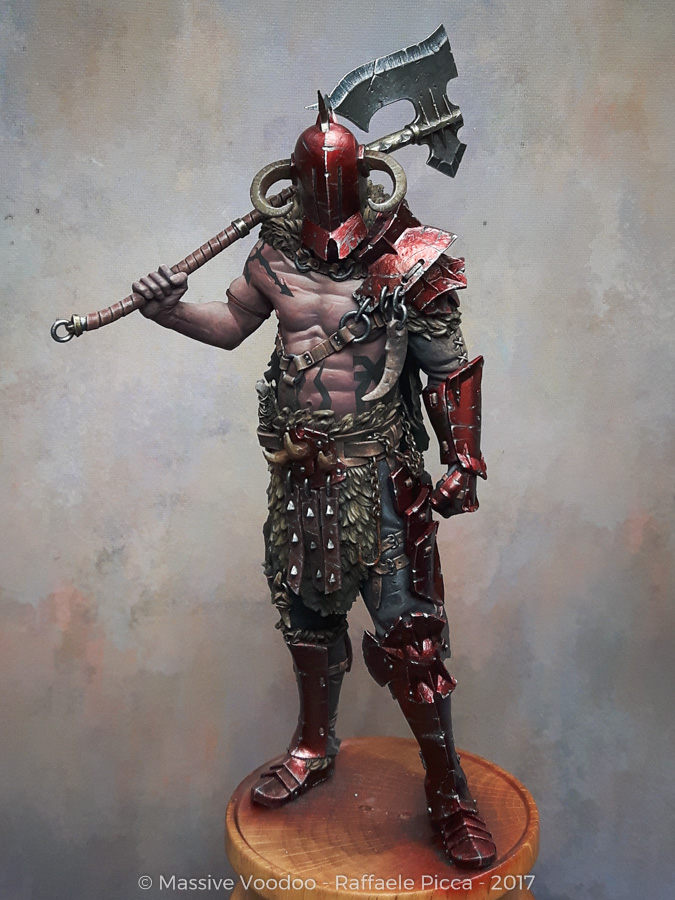
I decided to add some tattoos to his arm and chest. I just wanted to break up the big surface with some interesting shapes. You also notice the axe is finally painted.
Slowly, everything is coming to and end. The head was painted and glued in place. All that is missing are the final blood effects and the base.
Unfortunately I was in such a tight timeline, using up the last hours before my flight to build and paint the base, that I did not take any photos.
I really hope you enjoyed this little project log. I didn't call it a step by step as there are a couple of steps missing, especially the base and painting the different elements in detail.
But I hope you still got some inspiration for your next project out of this!
By the way, this project is for sale. So if you want to add a truly unique and one of a kind project to your collection, check out my Art Catalogue.
_______________________________________________________________________________
You want to support Massive Voodoo?
If you like to support or say thanks the monkeys of Massive Voodoo in what they do, please feel invited to drop a jungle donation in their direction via paypal or check their miniatures they got on sale here.
_______________________________________________________________________________
6
Kommentare
Labels:
Finished Miniatures,
Inspiration,
Sculpting,
Step by Step
Posted On 14 August 2017 at 8:11 AM
Posted On 14 August 2017 at 8:11 AM


This is truly interesting and a great look into your process, Raffa! Very cool to see that you are gradually smoothing and blending your sketched out light like this... I thought I am the only one using an Airbrush to smoothen out the final blendings...:) Hope I can take your class on this topic one fine day... Thanks for sharing! It was a lot of work for sure! Epic Video as well!
Fantastic article Raffa. Great to see the step by step of such an amazing piece. Very inspiring. Thanks for sharing mate!
Very great article Rafa!!! More thanks for inspiring !!
This would work extremely well in 28mm. Hint hint ;-)
EPIC!
-Jacob H.
Incredible, thanks for sharing all the info and step by step progress. This is an amazing project and article. I sure hope you'll do a project like this again, I love the larger scale models.