


In the last tutorial voting Sha'un - Ram Tribe Warrior was chosen by our readers! It was a very close decision, but in the end it won by only 3 votes. Next week the Slayer will get another chance to show the jungle his powers in Massive Voodoo's Year of the Painter!
This article was written by Raffa, so let's jump right in his brain and see how this figure was painted.
______________________________________________________________________________
After sculpting this really complex bust (at least for my skills at the moment) and receiving the first resin copies I started painting this bad boy right away.
I was really looking forward to have the copy in my hands, it's always a great feeling!
If you want to know more about the sculpting process, you can check out this or this wip post.
Let's jump right into the painting part.
I will paint Sha'un - Ram Tribe Warrior, a bust sculpted by myself and released in my own range of busts and figures: Forged Monkey.
For the color scheme I had some ideas, I wanted to keep it in the same style as the sculpt itself.
For the sculpt I had things like "natural, tribesman, warrior, earth, power, unstoppable" in my mind. I often connect certain attributes of a figure to certain elements in my head, especially for my own characters.
With Sha'un it was Earth, so the color scheme should be very earthy and natural.

This will be the area of the color circle that I will be using for the most parts of the figure along with some example colors.
After a little bit of thinking and with the decision to go with mainly browns for this paintjob I had a very desaturated, almost sepia color scheme in my mind.


You can also see I added more grey to the beard ( or is this called a goatee :D ) to make him look a bit elder and more experienced :-)

The reds were mixed with the existing skin color and were glazed in very thin layers.

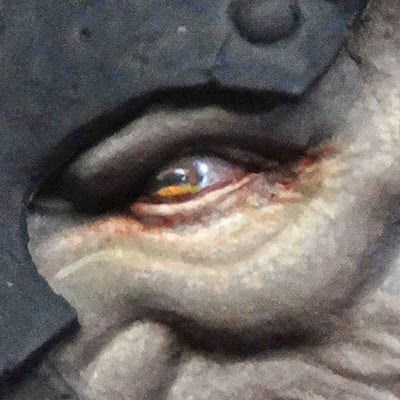
A little red in the corner really helps to bring some life into the eye. On this closeup you can also see how I tried to paint the skin areas not as simple skin, but more in a 'short fur' pattern using short brushstrokes to introduce this kind of 'dimple' texture.

Because he is an animal, I added some rheum to the eye to give it an even more animalish look.
If you look closely you can also see some added spots of lighter color at the sides of the mouth/nose area.


I called the face done for now and started preparing the leather straps with a basic, dark brown color.


I always do all the steps on the whole figure for one material. If I paint skin, I try to paint the whole skin of the figure, when I paint one type of leather, I paint all the leather straps (for different leather styles, I paint each style after another).


I really like tinting parts of the figure again with different colors after highlighting to make the material more interesting!

First I started with some airbrushing, a gradient from a light khaki to black was sprayed and the backside of the horn was sprayed in a bit darker brown.
You can also see that I started painting some grey highlights on the tip of the horns on this photo.

Also check out the ears! See how much orange/terracotta/red was added to them?
I really love the effect :)

More highlights were added to the horns, on the right side you can see the first highlight step and on the right side I added another highlight to all the small details.


Parts that I finished were the necklace and the yellow patch.
Now it's time for some metallic color!

I wanted to create a hammered finish on the metal parts. I think even if the armor looks very precisely crafted, the Ram Tribe smith who forged this armor is no goldsmith ;-)
All the metallic parts received this dabbed texture with dilluted black color.
To make the dabs look so soft, I used a glazing medium for acrylic colors (you can get those in your local art supply store).
The dabbing took some time, but I think it looks really interesting.


You can see how the edges of the armor were gently highlighted using the Heavy Metal tone by Scale. I didn't want to go over the top too fast with the metal parts.
My idea was to stay pretty dark overall to make it really look simple and old.

On the head armor however, I decided to already try the rust effect I was aiming for.
I wanted to give the Modelmates rust effect paint another try as Roman always tells me how awesome the stuff is.
And it really worked out well! For the first time with this product I really got the result I was looking for... phew, the sweat on my forehead evaporates :)
I used the Dark Rust effect for my armor parts.

I changed some of the rust parts later, but for now this is enough proof to me that this is the effect I am looking for. Especially because it has the same basic color range that I used on the rest of the bust.
On this photo you can also see that I came back to work on the eye again to add some more highlights because the eye was loosing focus against the strong reflection of the metal parts.
Another thing on this photo that is worth showing are the highlights on the metal parts. I tried not to glaze them but to also dab them using acrylic glazing medium. You can see that the gradient to the highlighted parts are actually a lot of small spots.


First, apply the rust effect in big amounts to all the places where you want to have rust later.
Then use isopropanol ( I guess you can also use other kind of stuff... like Tamiya Airbrush Thinner) applied with a brush to 'pull' the rust to the places where you want it.
The last step is to dab a cotton swab in the same liquid and clean the large surfaces where you don't want to have any rust.
This technique really gave me some nice results.
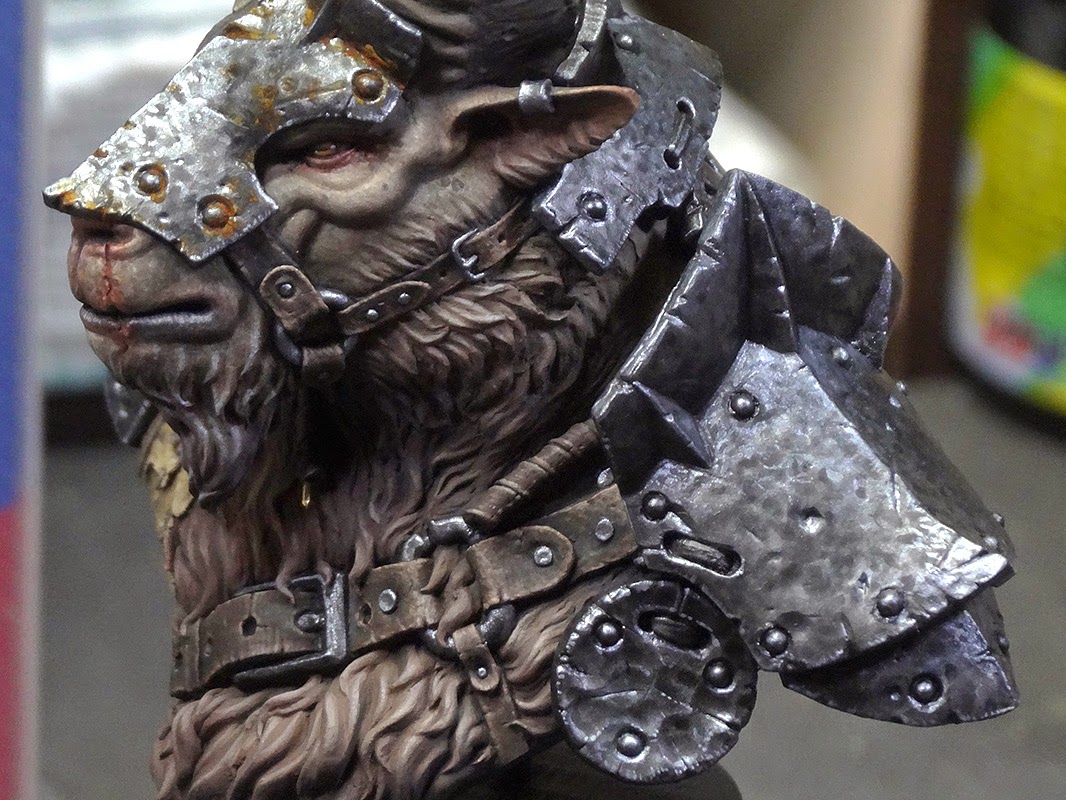
On the last photo you can also see that I painted all the leather straps on the armor in a very desaturated khaki.
You can also see a blood splatter (that actually looks very strange on this photo O_o), I added some blood splatters at the horns ... another detail that was added at the end to make the bust more interesting.
One of those blood splatters must have gone wrong and landed on the shoulder pad. Sometimes you can't control where the blood of your enemies flies, oh well.
At this point I called the bust done!
Here are the finished photos, but I still have to take some photos with my good camera, these were taken with a small compact camera and don't really do the paintjob justice. But it's eanough to get an impression :)


I really hope you liked the article, even when I forgot to take some photos in the end ( of painting the leather straps on the armor especially ).
If you like, you can also check out Roman's version of this bust again here.
Best wishes,
Raffa


Thanks for the detailed and comprehensive step-by-step. Great bust, great paintjob, nothing more to add.
Awesome step-by-step!
Thx for another step by step , can`t wait to put my brush on my own one . the work at the eyes are great , and the depth of the metalparts are awesome , not sure if I understood this step but gonna try it infuture anyway.
This is so amazing! I really need to get myself a bust of some sort and play around with brushes. Great tutorial, as always!
You mention "Scale's Black Metal" but I do not know the brand and, as you can imagine, searching for "scale's black metal" finds me agreeable music but not agreeable results.
Could you elaborate some more?
Hello Anton,
the company is called Scale 75 and the have some color sets aviable, the metal one is really recommandable.
Best wishes,
Raffa
ThatAmigo Says ...
Master Class! i love the different tones of brown that creates that bestial atmosphere.
thanks for sharing
I just stumbled over your side by chance (looking for something completely different with google search) and just got hooked... Your work looks so stunning and your step-by-step explanation is great and easy to follow. Thanks for that! :)