


Hey Jungle Painters,
Houston, we have a problem...
Raffa started this weeks tutorial voting without making sure everything was set up properly to launch the tutorial space shuttle.
The step by step of Azog isn't finished yet and Roman is still on travel to his beginner class.
So, while "Azog, the white orc" won in the tutorial voting, we have to delay the Azog tutorial by a week until Roman returns.
Oh my, this almost feels like real politics. Sorry!
Hope you still enjoy the tutorial of Thornley & Ratch!

Raffa will now take care of the article. We hope you enjoy!
You want to support us?
If you like to support or say thanks the monkeys of Massive Voodoo in what they do, please feel invited to drop a jungle donation in their direction via paypal or check their miniatures they got on sale here or here.
In this article you will see the whole process of the pirate bust "Thornley & Ratch" that I sculpted and painted. The bust is released at Fernando Ruiz Miniatures if you are interested in getting one!
This is the final result:

I wanted to achieve a very comical, illustrative style while keeping everything relatively simple.
For the metallic parts I chose a non metallic paint style (not using paints with metallic pigments) to fit the comic style.
Let's start with the step by step!
Sculpting
 I started with a sketch, this process usually takes me around 30 minutes to 1 hour.
I do it to brainstorm, for fun or to find shapes I like.
For this sculpture I used BeeS Putty Plastic Summer Xtra (whoah, what a name :D).
It is very hard and wax like, but bakeable.
 After some refining and changes I started to like the face.
The face also received some smoothing using ethanol (alcohol).
 I added the pirate bandana, clothing and did more refining to the face.
 A first sketch of the ferret that I wanted to add. I really didn't want to go for a parrot or something typical like that... a ferret just felt like the right thing :)
 The hat, this is an optional part, I prefer the bust without the hat, but I still wanted to give painters to option to play around. The hat was sculpted in two layers.
First, a "cap" was scultped on the hat using talcum to make it removable.
The rest of the shapes were also added and then the whole hat was baked.
After some carving and cutting I added the texture using BeeS Xtra dilluted with white spirit and dabbed it on with a brush.
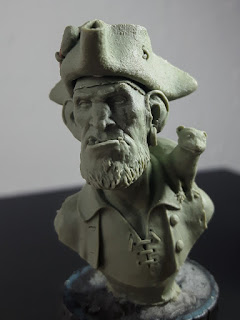 This is the finished bust after it was baked at 130°C.
Painting
 I started with a black and white basecoat to prime the bust. Unfortunately the white (new Games Workshop spraycan) gave a very dotted texture... I tried to fix it with another basecoat from the airbrush, but it wasn't perfectly even.... well, well, not a big deal ;)

 Most of the base colors were applied. For the bandana I tried to use only one layer of paints.
For the yellow I used "Iyanden Darksun", it's an old color but gives a very nice covering for a yellow.
The red was mixed with "Aldebaran Red" (Scale) and "Thornwood Green" (P3).
The blue is based on Dark Sea Blue (VMC), Vest is also based on Thornwood Green and Skin is Sand Brown (VMC).

 As a part of painting the basic colors I looked up some reference for the ferret and painted with those colors. You can also see that the beard was painted with a very desaturated ochre.
 The other side of the ferret was painted and the leather strips on the shirt received a dark brown base color.
 Shadows were added to most areas except the bandana. For the face Umbral Umber (P3) was used, for the most other colors the base color was darkened and desaturated.
 Lights were painted in the face using the basecolor + white and a bit of yellow.
 The shirt also got some lights using white + a bit of light brown, pure white was used for the brightest, smallest highlights.
 To paint the hightlights on the bandana I first masked it and sprayed the highlight in a very dilluted white using my Harder & Steenbeck Infinity.
 Using glazes of pure red and yellow (both by Scale Color) I brought back colors to the white highlight. Like this is was very easy getting a soft highlight in the different colors.
 Hightlights were added to the blue vest using Trollblood Base (P3).
You can also observe that a lot of color variation was added to the skin to bring back some life into the face. I used mostly reds, terracotta and orange tones. Some greens were also introduced to the sides of the head.
First shadows were painted on the bandana using Tank Brown (Vallejo Air Color) in transparent layers.
The eyes also got some love :)
 Under the eyes I also used violet.
 Another view to give a better look on the shadows that were painted on the bandana.
 And the back was also done. Some shadows were intensified using a little bit of black + Tank Brown.
 More detail lights were added in the face.
 The little leather straps on his shirt got a highlight and the beard was also highlighted with a mix of the basecolor + Birch (Scale Color).
If you look closely you can also observe that some more colors were introduced in different materials. Slight yellows and browns were glazed onto the blue vest and bright shirt to make it look more interesting.
The metallic parts were painted with a Non Metallic Metal style:
 Here are two enlarged photo crops of the metal parts with the color palettes next to it.
I am not a big fan of recipes, I try to imagine what things surround the miniature in it's world.
I tried to give the effect of a bright floor reflection, maybe the ships deck?
Try to play with colors and don't stay in one color. Metal is not grey!
 Here's another photo with the color variation being more visible. Some more small changes were made before calling the project done:
 You can see I used some browns to create the effect of the clothing being dirty.
To do this you can paint pools of dilluted color on your mini and let it dry for some seconds. When you see the edge is starting to dry, pull away the rest of the pool with a wet brush leaving only a tiny edge of the pool.
Try it, it's very easy :)
I really hope you enjoyed this Step by Step!
If you want to create your own version of this Pirate Ogre, you can get a copy of the bust at Fernando Ruiz Miniatures!
Houston, we have a problem...
Raffa started this weeks tutorial voting without making sure everything was set up properly to launch the tutorial space shuttle.
The step by step of Azog isn't finished yet and Roman is still on travel to his beginner class.
So, while "Azog, the white orc" won in the tutorial voting, we have to delay the Azog tutorial by a week until Roman returns.
Oh my, this almost feels like real politics. Sorry!
Hope you still enjoy the tutorial of Thornley & Ratch!

Raffa will now take care of the article. We hope you enjoy!
You want to support us?
If you like to support or say thanks the monkeys of Massive Voodoo in what they do, please feel invited to drop a jungle donation in their direction via paypal or check their miniatures they got on sale here or here.
In this article you will see the whole process of the pirate bust "Thornley & Ratch" that I sculpted and painted. The bust is released at Fernando Ruiz Miniatures if you are interested in getting one!
This is the final result:
I wanted to achieve a very comical, illustrative style while keeping everything relatively simple.
For the metallic parts I chose a non metallic paint style (not using paints with metallic pigments) to fit the comic style.
Let's start with the step by step!
Sculpting

I do it to brainstorm, for fun or to find shapes I like.
For this sculpture I used BeeS Putty Plastic Summer Xtra (whoah, what a name :D).
It is very hard and wax like, but bakeable.

The face also received some smoothing using ethanol (alcohol).


First, a "cap" was scultped on the hat using talcum to make it removable.
The rest of the shapes were also added and then the whole hat was baked.
After some carving and cutting I added the texture using BeeS Xtra dilluted with white spirit and dabbed it on with a brush.

Painting


For the yellow I used "Iyanden Darksun", it's an old color but gives a very nice covering for a yellow.
The red was mixed with "Aldebaran Red" (Scale) and "Thornwood Green" (P3).
The blue is based on Dark Sea Blue (VMC), Vest is also based on Thornwood Green and Skin is Sand Brown (VMC).


You can also observe that a lot of color variation was added to the skin to bring back some life into the face. I used mostly reds, terracotta and orange tones. Some greens were also introduced to the sides of the head.
First shadows were painted on the bandana using Tank Brown (Vallejo Air Color) in transparent layers.
The eyes also got some love :)


If you look closely you can also observe that some more colors were introduced in different materials. Slight yellows and browns were glazed onto the blue vest and bright shirt to make it look more interesting.
The metallic parts were painted with a Non Metallic Metal style:

I am not a big fan of recipes, I try to imagine what things surround the miniature in it's world.
I tried to give the effect of a bright floor reflection, maybe the ships deck?
Try to play with colors and don't stay in one color. Metal is not grey!


To do this you can paint pools of dilluted color on your mini and let it dry for some seconds. When you see the edge is starting to dry, pull away the rest of the pool with a wet brush leaving only a tiny edge of the pool.
Try it, it's very easy :)
I really hope you enjoyed this Step by Step!
If you want to create your own version of this Pirate Ogre, you can get a copy of the bust at Fernando Ruiz Miniatures!


Great step by step.
Beautifully painted, so many colours on such a tiny area, impressive. I enjoyed your explanation about your sculpting process. Ever thouht about giving sculpting classes? I´d join to.
How about a private coaching on sculpting instead of painting even though I could use both?
Great pirate, Sir.
The big ears are not relly my taste. But the ferret is a nice addition.
hrld
What were the colors used for the shirt?