


Good Tuesday Morning Jungle Painters,
time again for a step by step article once again.
The jungle of Massive Voodoo is proud to present to you a step by step of Ragnok, Norse Orc Hero - an insight on Roman's paintjob. You can find many step by steps in MV's article section.
We hope you enjoy and now Roman is taking over ...
_________________________________________________________________________________

Hiho!
Well, it's been a little while since I wrote a step by step, but there are some on my future agenda.
I am always looking forward to prepare and write articles like this, but on the other hand it takes time to get all the preps ready.
FOREWORD
I painted this bust twice on comission. Why twice? Well, the initial plan was to paint him once in a "normal", easy readable version. I failed with the first one and went a little crazy with colours, OSL and athmosphere. After I realized that I decided to paint him again as a promotional paintjob should be something more easy to be inspired from.
Well, also should start this article series with this crazy first version, but I won't. Why? Well, I think I go with the easier one first. Just feels right, no more explanation on this case from now on.
This article will give you an insight in my paintwork of the "green version" of
Ragnok, Orc Norse Hero by Fer Miniatures.

PAINTING PROCESS
First things first. After the resin was cleaned up I primed the model black and white. I am planning to put that bust to a beautiful plinth, but for the painting process I used a "work plinth". I know how messy I can get while throwing colours. While priming I already kept my zenithal light in mind and put a lot of white to the forehead/face.

Alright. I just went in, tackle what had to be tackled. It has been a crazy hot summer and while I painted this guy my colors dried so fast, really. Picking it up from the wet palette and to the model ... ah dry.
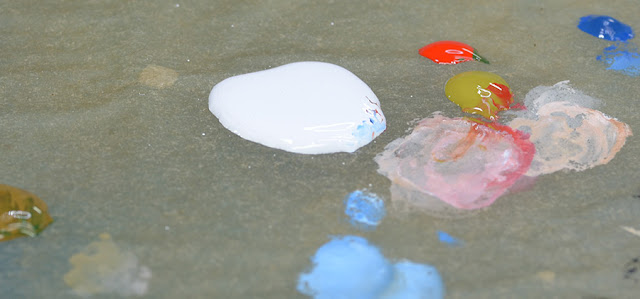
Choosing some brownish leather tones for the base sketch and did the same for the skintone. Rough applyment, nothing to serious right now. Don't worry, be happy.

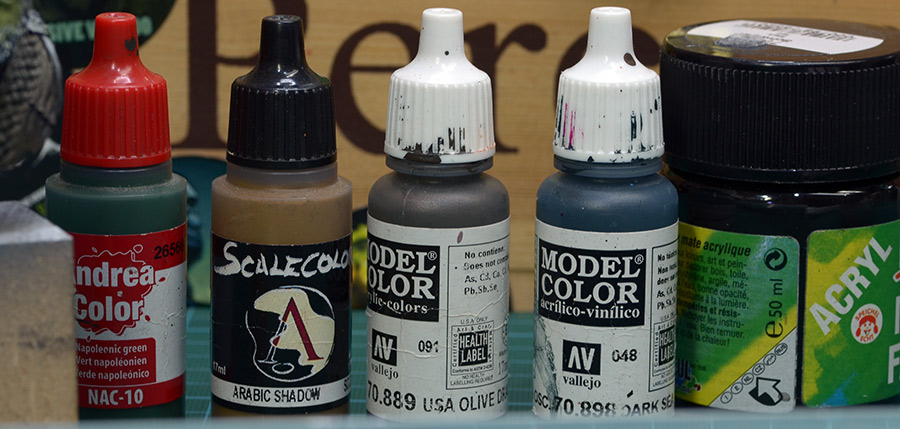
The colour I used for the leather was "US Olive Drab" from VMC. I like this tone a lot as it is very neutral in its tone and lets you paint leather in light and shadow, but still you can choose it's colour variation later on. So a good decision if you are unsure, unsecure or just don't mind. Want to know more about my starting thoughts while painting?

For the skintone I decided for a mix from a dark green of Andrea Colors and Arabic Shadow from Scale75. Drop of this, drop of that, skintone ready. I thinned my skintone a little bit with water and applied it several times to the face until no primer was left to see.

More colors come into play. Still very neutral ones. Black and Dark Sea blue by VMC. Just to bring color to undefined areas. Still sketching, having fun.

You can see where I placed them, and you can see how the green on the face gets more intense and opaque by several layers. Well, slowly. Added a little black/leather tone was to the leathers too.


More and more layers of green, more skintone appears. Using some red tones to mix into my basic skintone to apply first shadows. Using a red/white to add to the green skintone for painting the lip. Still sketching. Using a some beige to be added to the blacks and leather tones for first highlights.

Great name for a color :D

Ok, repainting the eyes now. Basic tone for the eyeball is a reddish white, others would name it pink.
Skintone appears much more opaque by now. Eyeballs painted... mkay, pink.
See the blurry guy in the background? That's version one, he is taking his brother under close view.

Eyes painted. Closing in with more and more tones for the leathers. Just using the tones I already have on my wetpalette. Same for the teeth. Brown beard.
On the plinth you can see the way I have painted the skin so far. Basic tone is second from the left. Then more - and slow proceeding - highlights have been painted in zenithal light.

While I intensed the beard's reddish brown I decided to give the leather parts several glazes with it. While painting edge highlights here and there with a sold beige tone I also painted the teeth, small ties and small texture details in the leathers. I call this bringing all together.
While painting more highlights to the skin I am not only focusing on painting a zenithal light situation, I also concentrate on the very cool sculpted varities of skin texture and pay them attention with my brushtip. Chuck! Chuck!

A line here, a dot here, a little volume there, a little chuck! chuck! here ... and over again with the next highlight. Small steps with your highlight, mix in your highlight slllllooooowwwwllllyyyyy!
Like the new eyes much better. Evil Viking Orc.

Orangy brown tones to the hair and thin orange glazes to the leather parts to pull them all together again.

Having a close up look on my leather works. As you can see I painting rough and bright structure and texture to the areas in highlights. A collection of dots here, a scratch on an edge and so on. I am glazing over this afterwards to make is smooth again and I will still keep the texture underneath.
Metals have been painted in bronze with light and shadow too of course. Also added a little bit verdigris to it.

While working my way into stronger highlights and shadows at the skin I still follow the rules of zenithal light, but also work a little bit on texturizing the skin. In this bust you find many sculpted volumes, try to see them all, even the smallest one and not only see them, throw them some paint. Do the same procedure like on the leathers, glazing afterwards will make it all smooth again.

Overview:

More and more time went into the detail work of applying some color and glazing it together again. Soon I will declare the bust finished, but not yet. First he was ready to move to the plinth beauty to see how they look together, color wise.
Using basic skintone and some darker blue I painted some tattoos on the guys head.

I was happy how the orangy hair catches up with the tone of the plinth and enjoyed how they play together.


You can see more photos on Putty&Paint if you like!
I hope you enjoyed this little walkthrough and insight into my thoughts.
Now I am good to explain the crazy first version to you soon!
Keep on happy painting!
Best Wishes,
Roman
time again for a step by step article once again.
The jungle of Massive Voodoo is proud to present to you a step by step of Ragnok, Norse Orc Hero - an insight on Roman's paintjob. You can find many step by steps in MV's article section.
We hope you enjoy and now Roman is taking over ...
_________________________________________________________________________________
Hiho!
Well, it's been a little while since I wrote a step by step, but there are some on my future agenda.
I am always looking forward to prepare and write articles like this, but on the other hand it takes time to get all the preps ready.
FOREWORD
I painted this bust twice on comission. Why twice? Well, the initial plan was to paint him once in a "normal", easy readable version. I failed with the first one and went a little crazy with colours, OSL and athmosphere. After I realized that I decided to paint him again as a promotional paintjob should be something more easy to be inspired from.
Well, also should start this article series with this crazy first version, but I won't. Why? Well, I think I go with the easier one first. Just feels right, no more explanation on this case from now on.
This article will give you an insight in my paintwork of the "green version" of
Ragnok, Orc Norse Hero by Fer Miniatures.
This is version 2:

PAINTING PROCESS
First things first. After the resin was cleaned up I primed the model black and white. I am planning to put that bust to a beautiful plinth, but for the painting process I used a "work plinth". I know how messy I can get while throwing colours. While priming I already kept my zenithal light in mind and put a lot of white to the forehead/face.

Alright. I just went in, tackle what had to be tackled. It has been a crazy hot summer and while I painted this guy my colors dried so fast, really. Picking it up from the wet palette and to the model ... ah dry.
Choosing some brownish leather tones for the base sketch and did the same for the skintone. Rough applyment, nothing to serious right now. Don't worry, be happy.

The colour I used for the leather was "US Olive Drab" from VMC. I like this tone a lot as it is very neutral in its tone and lets you paint leather in light and shadow, but still you can choose it's colour variation later on. So a good decision if you are unsure, unsecure or just don't mind. Want to know more about my starting thoughts while painting?

For the skintone I decided for a mix from a dark green of Andrea Colors and Arabic Shadow from Scale75. Drop of this, drop of that, skintone ready. I thinned my skintone a little bit with water and applied it several times to the face until no primer was left to see.

More colors come into play. Still very neutral ones. Black and Dark Sea blue by VMC. Just to bring color to undefined areas. Still sketching, having fun.
You can see where I placed them, and you can see how the green on the face gets more intense and opaque by several layers. Well, slowly. Added a little black/leather tone was to the leathers too.

A cold black was created by using Dark Sea blue and Black.

Meanwhile painting more and more layers of the skintone.

Painted the eyes blue. Do not like them at all. Did change them later on.

More and more layers of green, more skintone appears. Using some red tones to mix into my basic skintone to apply first shadows. Using a red/white to add to the green skintone for painting the lip. Still sketching. Using a some beige to be added to the blacks and leather tones for first highlights.

Great name for a color :D

Ok, repainting the eyes now. Basic tone for the eyeball is a reddish white, others would name it pink.

Skintone appears much more opaque by now. Eyeballs painted... mkay, pink.
See the blurry guy in the background? That's version one, he is taking his brother under close view.

Eyes painted. Closing in with more and more tones for the leathers. Just using the tones I already have on my wetpalette. Same for the teeth. Brown beard.
On the plinth you can see the way I have painted the skin so far. Basic tone is second from the left. Then more - and slow proceeding - highlights have been painted in zenithal light.

While I intensed the beard's reddish brown I decided to give the leather parts several glazes with it. While painting edge highlights here and there with a sold beige tone I also painted the teeth, small ties and small texture details in the leathers. I call this bringing all together.
While painting more highlights to the skin I am not only focusing on painting a zenithal light situation, I also concentrate on the very cool sculpted varities of skin texture and pay them attention with my brushtip. Chuck! Chuck!

A line here, a dot here, a little volume there, a little chuck! chuck! here ... and over again with the next highlight. Small steps with your highlight, mix in your highlight slllllooooowwwwllllyyyyy!
Like the new eyes much better. Evil Viking Orc.

Orangy brown tones to the hair and thin orange glazes to the leather parts to pull them all together again.

Having a close up look on my leather works. As you can see I painting rough and bright structure and texture to the areas in highlights. A collection of dots here, a scratch on an edge and so on. I am glazing over this afterwards to make is smooth again and I will still keep the texture underneath.
Metals have been painted in bronze with light and shadow too of course. Also added a little bit verdigris to it.

While working my way into stronger highlights and shadows at the skin I still follow the rules of zenithal light, but also work a little bit on texturizing the skin. In this bust you find many sculpted volumes, try to see them all, even the smallest one and not only see them, throw them some paint. Do the same procedure like on the leathers, glazing afterwards will make it all smooth again.

Overview:

More and more time went into the detail work of applying some color and glazing it together again. Soon I will declare the bust finished, but not yet. First he was ready to move to the plinth beauty to see how they look together, color wise.
Using basic skintone and some darker blue I painted some tattoos on the guys head.

I was happy how the orangy hair catches up with the tone of the plinth and enjoyed how they play together.

Final stage of painting has been more and more glazing and tiny spots where I increased the highlights, and glazed again. This is often the spot in a project where motivation lacks, but is very needed to finish it properly. A too hot studio room does not help either. Well, push on through it.
Some reddish glazes to the eye sockets, nose, ears. Some blood on his cheek wound. Some blood to his side of the body as he just had slain a goblin villager.
The finished version:


You can see more photos on Putty&Paint if you like!
I hope you enjoyed this little walkthrough and insight into my thoughts.
Now I am good to explain the crazy first version to you soon!
Keep on happy painting!
Best Wishes,
Roman


Great step by step, thx Roman :)
Hi,
great tutorial (as usual). But again, after all this Tutorials, new ideas!
I love the idea of showing the various skin colors and how you buildt them up and how you mixed them on the plinth. Sometimes a picture really tells more than a thousand words. GREAT IDEA!
If I had a wish (christmas is getting closer), i would be verrrry happy to see these "color-mixing-charts" on the plinth more often. ;o)
Es ist auch wirklich schön und hilfreich Deine älteren Tutorials mal wieder zu lesen. Das verlinkte "My starting thoughts while painting" hatte ich zwar mit Sicherheit schon gelesen, da ich momentan aber in einer "malerischen Sackgasse" stecke dachte ich mir - kann ja nix schaden. Und es hat mir wirklich die Augen geöffnet und mich quasi wieder geerdet. Vielen Dank dafür!
Beim Studium des Tutorials ist mir auch mal wieder bewusst geworden wie lange Du schon Dein Wissen, Dein Können, Deine Erfahrung und Deine Inspiration mit uns teilst. Allerbesten Dank dafür und möge die Muse nie aufhören Dich zu küssen!!!!!
Viel Spaß im "neuen" Studio.
Thank you both for your kind comments. Happy you enjoyed the article!